July 15:
Thankful to have a block swapping group to be apart of! I have always wanted to block swap (for quilting) with someone or a group. I did one in Okinawa, when we were stationed there, and loved it! Now I am excited to try some new techniques!!!
July 16:
I am thankful for my quilting/sewing room. Somedays its my only escape from reality.
July 17:
My little man is picking up on so many new signs. I am so thankful and happy he is enjoying signing, because it sure does make it a lot easier to understand what he wants.
July 18:
Thankful for 12 straight hours of sleep. I needed that!
July 19:
Today is my older sisters birthday, and I am thankful for her and everything she has done for me. We have never been as close as we are now, and I am so lucky to have her as my amazing, supportive, and wonderful sister. Happy Birthday Rach!
July 20:
Finished up all the minor details on the ring sling, and am so thankful its working out great for us. Jared is loving it, and so am I!
July 21:
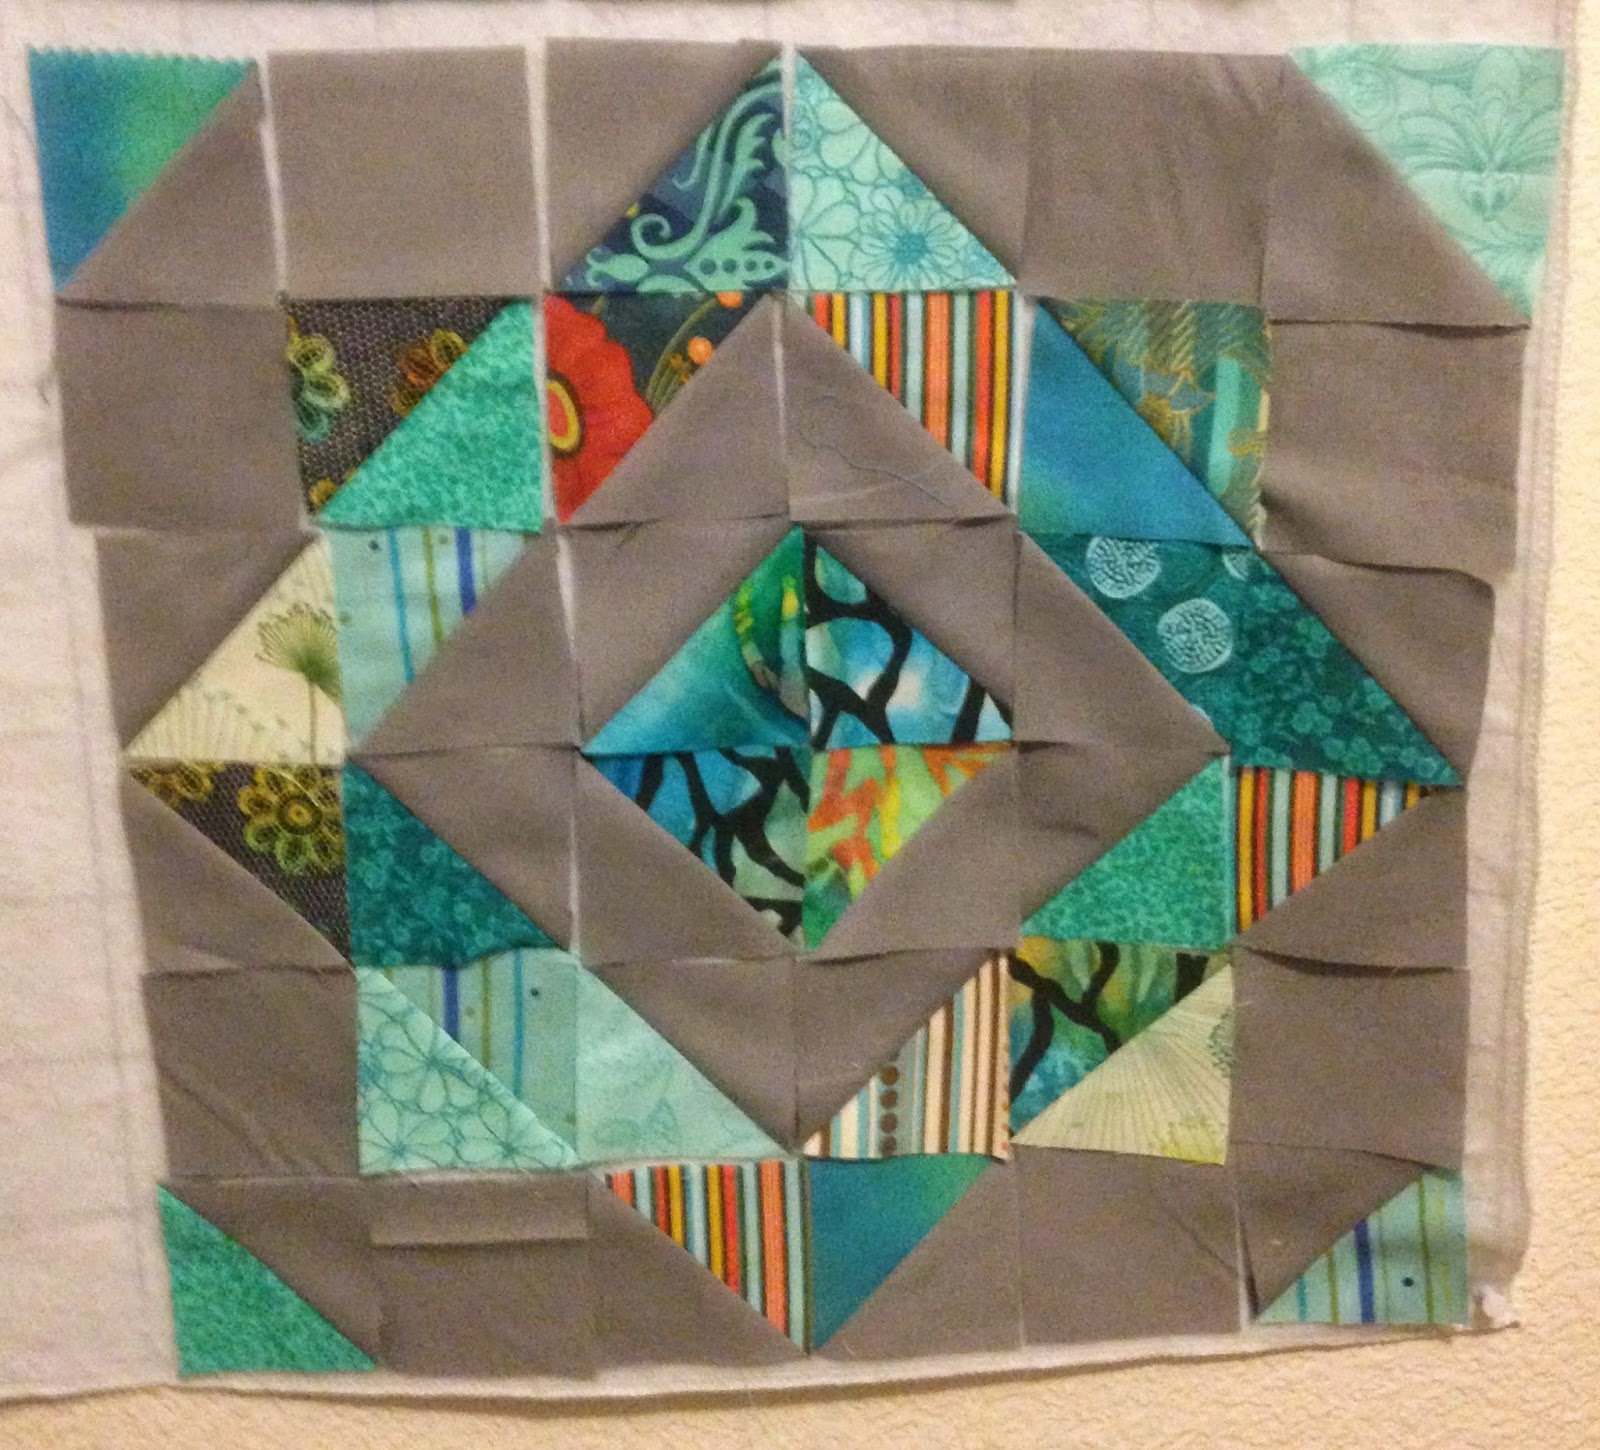
Finally, I got some block swap blocks laid out. Thankful that I had enough energy and will power to stay up later to get a few set up and on my design wall.
Give Thanks,
Sarah
Tuesday, July 22, 2014
Shadow Box Project
When I had my first son, a wonderful friend of mine made a really cute shadow box for his room. It had all sorts of cute pictures, scrap paper, stickers, and so much work had gone in to it. I cried when I opened it. It was so perfect and such a thoughtful gift. I loved it from day one and still love it.
This is what it looks like, and still hangs in their room today.
Then a year and some change later I found out I was pregnant with our second child. I knew instantly I wanted to make another one of the shadow boxes to keep the theme going. I purchased the same exact shadow box, and collected stickers, pictures, and everything else I could find.
I busted out my old scrapbooking tools, and started working on the shadow box. I measured a hundred times, and still managed to chop some of the stickers off, but it still is super cute! I made this around my sons 9 month or 10 months, and honestly wanted just pregnancy, delivery and baby photos.
I am so thankful for such an amazing friend who put such love and thought into the gift, because it gave me a way to capture those precious moments that go by so fast.
Heres my attempt at it:
The first one is a lot better then mine, but I love them both!
Scrapbook Away,
Sarah
Labels:
baby,
birth,
child,
easy project,
friend,
gift,
infant,
memory,
pictures,
present,
project,
scrapbook,
shadow box,
shadow box picture,
stickers
Saturday, July 19, 2014
Felt Cookies
Now that the kids stove is done, I wanted to make some felt cookies for the boys to play with. My oldest son loves to bake cookies with myself or his father. We love being in the kitchen. I decided he would get a kick out of having his own. I also had a Wilton cake lifter that is large enough to work as a kid size cookie sheet. You can purchase them at most local craft shops that carry Wilton, or purchase it here!
If you want to make some of these felt cookies you will need to purchase the sandstone and antique white sheets for the outside of the cookies. For the chocolate chips I purchased the copper canyon felt sheet. You can purchase them at joanns, and heres the link to the felt.
You will need a small amount of cotton embroidery floss. You don't need any particular type, as there are so many. You can just grab the smallest bundle or the cheapest. I had an awesome mother in law who had some on hand that I used. You want to match your floss to your felt as close as you can; for the sandstone, the antique white and the copper canyon (those are the cookie circles and the chocolate chips).
The last few things you will need is some type of batting. A fluffy one or a thin one, doesn't matter as you can always add more layers of it or less. You can also use poly-fill. Now just add the basic stuff, a needle for the floss, and scissors.
You are all set. Time to make some cookies.
To start you will want to choose a circle size. I used a cup I had on hand. You want a front and back for each cookie. Then cut out the batting slightly SMALLER then the cookie circle. I cut two pieces of batting for each cookie, but my batting was very thin. Just do what feels right to you. No right or wrong here!
To make the sprinkle covered cookie, you will need to make french knots on one circle piece. This will be on the antique white felt. Use different colored floss to make the knots all over the top of the cookie. Heres a quick easy video on how to make french knots:
FRENCH KNOT VIDEO
Once the top of the cookie is covered in different colored french knots, then add the batting and the back of the cookie. Using a blanket stitch around the edge of the two cookie pieces, close the cookie.
BLANKET STITCH
Once you finish the blanket stitch, tie off two knots (or three), and you are done. Complete the other cookies just like that.
TIP: I took all the tops of the cookies, cut one long strand of colored floss and used it for all the cookie tops. Then move to the next color, and then the next, etc. Once those are done then just do the blanket stitch and your done. No threading and re-threading a hundred times!
Now on to the chocolate chip cookies! These are a lot easier. Cut out random chocolate chunks, any shape any size. Whip stitch them onto the tops (and backs if you want) to the sandstone felt circles. Once you have enough chunks of chocolate that you like, add the layer(s) of batting, and the back of the cookie and blanket stitch them closed. Super easy!
These cookies are fun and the kids love playing with them, "baking" them, and "eating" them for dessert! I hope your kids enjoy them just as much as mine do.
Bake On,
Sarah
If you want to make some of these felt cookies you will need to purchase the sandstone and antique white sheets for the outside of the cookies. For the chocolate chips I purchased the copper canyon felt sheet. You can purchase them at joanns, and heres the link to the felt.
You will need a small amount of cotton embroidery floss. You don't need any particular type, as there are so many. You can just grab the smallest bundle or the cheapest. I had an awesome mother in law who had some on hand that I used. You want to match your floss to your felt as close as you can; for the sandstone, the antique white and the copper canyon (those are the cookie circles and the chocolate chips).
The last few things you will need is some type of batting. A fluffy one or a thin one, doesn't matter as you can always add more layers of it or less. You can also use poly-fill. Now just add the basic stuff, a needle for the floss, and scissors.
You are all set. Time to make some cookies.
To start you will want to choose a circle size. I used a cup I had on hand. You want a front and back for each cookie. Then cut out the batting slightly SMALLER then the cookie circle. I cut two pieces of batting for each cookie, but my batting was very thin. Just do what feels right to you. No right or wrong here!
To make the sprinkle covered cookie, you will need to make french knots on one circle piece. This will be on the antique white felt. Use different colored floss to make the knots all over the top of the cookie. Heres a quick easy video on how to make french knots:
FRENCH KNOT VIDEO
Once the top of the cookie is covered in different colored french knots, then add the batting and the back of the cookie. Using a blanket stitch around the edge of the two cookie pieces, close the cookie.
BLANKET STITCH
Once you finish the blanket stitch, tie off two knots (or three), and you are done. Complete the other cookies just like that.
TIP: I took all the tops of the cookies, cut one long strand of colored floss and used it for all the cookie tops. Then move to the next color, and then the next, etc. Once those are done then just do the blanket stitch and your done. No threading and re-threading a hundred times!
Now on to the chocolate chip cookies! These are a lot easier. Cut out random chocolate chunks, any shape any size. Whip stitch them onto the tops (and backs if you want) to the sandstone felt circles. Once you have enough chunks of chocolate that you like, add the layer(s) of batting, and the back of the cookie and blanket stitch them closed. Super easy!
These cookies are fun and the kids love playing with them, "baking" them, and "eating" them for dessert! I hope your kids enjoy them just as much as mine do.
Bake On,
Sarah
Labels:
blanket stitch,
cookie,
cookies,
embroidery floss,
fake food,
felt,
felt food,
floss,
french knot,
hand sew,
kid food,
play food,
play toy,
sew
Thursday, July 17, 2014
DIY Kids Stove
As we all know, I am a huge DIY mom! If I can use something I have on hand, add a little elbow grease and a little bit of crafty paint, I will make it happen.With that being said, I was in love with all those cute kid stoves. Lets be honest though, I am not about to pay $100-$300 for some piece of plastic to just get beat up and have the stickers fall off. No thank you! I started doing some research, and clicked away for weeks. I finally decided I would use our old microwave stand and convert that into a mini stove/oven/refrigerator unit for our boys!
Heres the original stand:
It had doors on the front and a shelf in the middle, but my husband removed those as he was going to create a half door and more shelving units.
This is the unit with the hardware (purchased at ikea) and the new doors and hinges. My husband used piano/cabinet hinges that were pretty cheap. We used the old hardware for the "refrigerator" door (on the right), and used the old doors closing hardware (the black looking thing) to keep the "oven" door closed.
Step 1: If you have a unit that has a silky smooth fake varnish like feel then you will want to sand that sucker down. Get it rough and pull as much smooth surface off. Once thats done prime the entire thing. I used a primer that was for laminated furniture. It worked out perfect! Its pretty sticky so make sure you get extra rollers and brushes, as this was a prime and toss the brushes kind of primer.
Step two: Start painting the unit the way you want it to be! I did some 2nd priming in certain areas that needed it, so be sure to let your unit sit over night before you try to paint. I wanted the top left unit to be the oven. I used a flat black paint (purchased at a local craft store) and painted the inside and door, as well as a small window on the front (later on).
I then used painters tape to tape off the unwanted areas, and painted certain pieces of the unit in one color. I then let that dry over night and did a second coat. If you are going to paint the entire thing in one color then don't worry about the painters tape!
I then used the second color (orange) and painted the rest of the unit. I again waited over night and did some touch up spots to give it a nice thick layer of paint.
This is after the 2nd orange paint, and the black window for the oven.
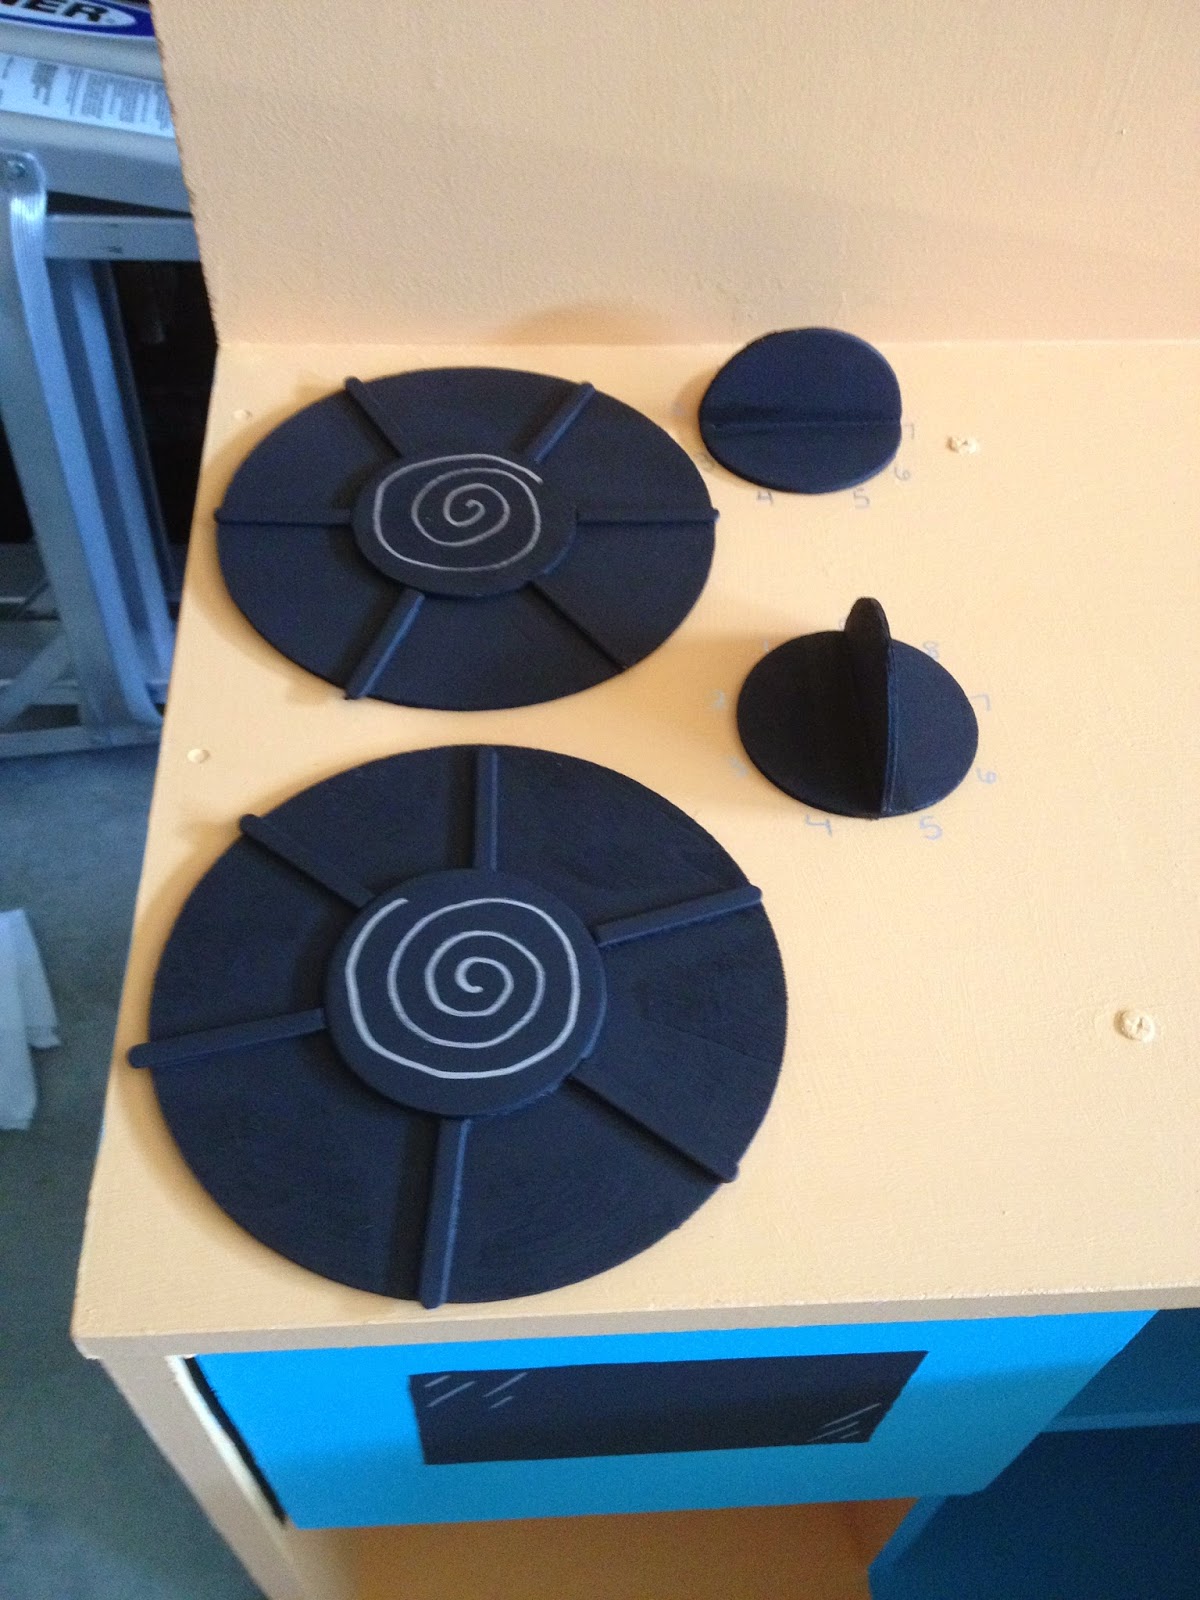
For the hardware I used just small wood circles and Popsicle sticks that you can purchase at your local craft shop. I cut the Popsicle sticks to fit a small circle on the big circle (for the stove pieces). I then took one of the smaller circles and cut it in half for the dials (for the oven).
I then painted everything black. Waited a few hours, used wood glue and glued everything together.
I added some silver paint pen to the window and burners, as well as put the numbers on the oven knobs.
I then had my husband help me place the hardware (again purchased at ikea) and screw those in place. Super easy and simple. Its now done!!! I will more then likely add new things as I go, but for now they can play away!
I have not put a sealant on the paint, but plan to when I add the rest of the small projects to it. If I ever get around to it. With two kids, who knows when that will be.
In the end we bought the hardware, paint and primer, a few brushes and tape. I believe the grand total was under $50!!! I had the black paint, I had the a few brushes and the unit. It was a nice week long project that turned into a month long project because I slacked a little, but hey it got done and its now being used daily!!!
A Win For This DIY MOM,
Sarah
Heres the original stand:
It had doors on the front and a shelf in the middle, but my husband removed those as he was going to create a half door and more shelving units.
This is the unit with the hardware (purchased at ikea) and the new doors and hinges. My husband used piano/cabinet hinges that were pretty cheap. We used the old hardware for the "refrigerator" door (on the right), and used the old doors closing hardware (the black looking thing) to keep the "oven" door closed.
Step 1: If you have a unit that has a silky smooth fake varnish like feel then you will want to sand that sucker down. Get it rough and pull as much smooth surface off. Once thats done prime the entire thing. I used a primer that was for laminated furniture. It worked out perfect! Its pretty sticky so make sure you get extra rollers and brushes, as this was a prime and toss the brushes kind of primer.
Step two: Start painting the unit the way you want it to be! I did some 2nd priming in certain areas that needed it, so be sure to let your unit sit over night before you try to paint. I wanted the top left unit to be the oven. I used a flat black paint (purchased at a local craft store) and painted the inside and door, as well as a small window on the front (later on).
I then used painters tape to tape off the unwanted areas, and painted certain pieces of the unit in one color. I then let that dry over night and did a second coat. If you are going to paint the entire thing in one color then don't worry about the painters tape!
I then used the second color (orange) and painted the rest of the unit. I again waited over night and did some touch up spots to give it a nice thick layer of paint.
This is after the 2nd orange paint, and the black window for the oven.
For the hardware I used just small wood circles and Popsicle sticks that you can purchase at your local craft shop. I cut the Popsicle sticks to fit a small circle on the big circle (for the stove pieces). I then took one of the smaller circles and cut it in half for the dials (for the oven).
I then painted everything black. Waited a few hours, used wood glue and glued everything together.
![]() |
| Stove top. Small circle, glued onto a large circle, with Popsicle sticks as the burners. |
![]() |
| These are the oven knobs. Small circle, with half a small circle glued on top. |
I added some silver paint pen to the window and burners, as well as put the numbers on the oven knobs.
I then had my husband help me place the hardware (again purchased at ikea) and screw those in place. Super easy and simple. Its now done!!! I will more then likely add new things as I go, but for now they can play away!
I have not put a sealant on the paint, but plan to when I add the rest of the small projects to it. If I ever get around to it. With two kids, who knows when that will be.
In the end we bought the hardware, paint and primer, a few brushes and tape. I believe the grand total was under $50!!! I had the black paint, I had the a few brushes and the unit. It was a nice week long project that turned into a month long project because I slacked a little, but hey it got done and its now being used daily!!!
A Win For This DIY MOM,
Sarah
Labels:
DIY,
diy oven,
diy stove,
easy project,
kid,
kid ove,
kid stove,
kid toy,
kitchen toy,
kitchen unit,
oven unit,
paint,
prime,
sand,
stove unit,
toddler
Tuesday, July 15, 2014
Hexagon Pillows
I am desperate to change my living room decor. One way to start is to add some color. I hate how dark our couches are; even though a few years ago I loved them. I want to make or buy a slipcover for them, but for now a quick pillow project will help bring some bright colors to the room. This project only took a few hours and the results are beautiful.
To get started you will need enough fabric for the pillow size you want to make. I made TWO: 18 inch by 18 inch pillows. Thats 4: 18 x 18 pieces of fabric. If your fabric is 36 inches wide, then you will only need a yard of fabric. if your fabric is shorter than 36 then you might need more, or you can change the size of the pillows according to the fabric you want to use.
Once you have the fabric and your pillow fronts and backs cut out, then find your hexagon fabric or buy pre-cuts. I had pre-cuts sitting around, so I grabbed a few from the pile. (I used these PRE-CUT hexagons).
Once you have the hexagons cut out, take a piece of Heat N Bond and make a template for slightly smaller then the hexagon. Then cut out and make however many more you need. I had 11 hexagons, so I made 11 cut outs of hexagons from the Heat N Bond.
The next thing you will do is read the instructions carefully. The Heat N Bond has two adhesive sides, and you'll want to make sure you do this correctly. (If not you can gunk up your iron or ironing board). Take the Heat N Bond and place the non paper side onto the wrong side of your hexagon fabric. Carefully iron the paper down onto the hexagon. I start in one corner and move across and out slowly.
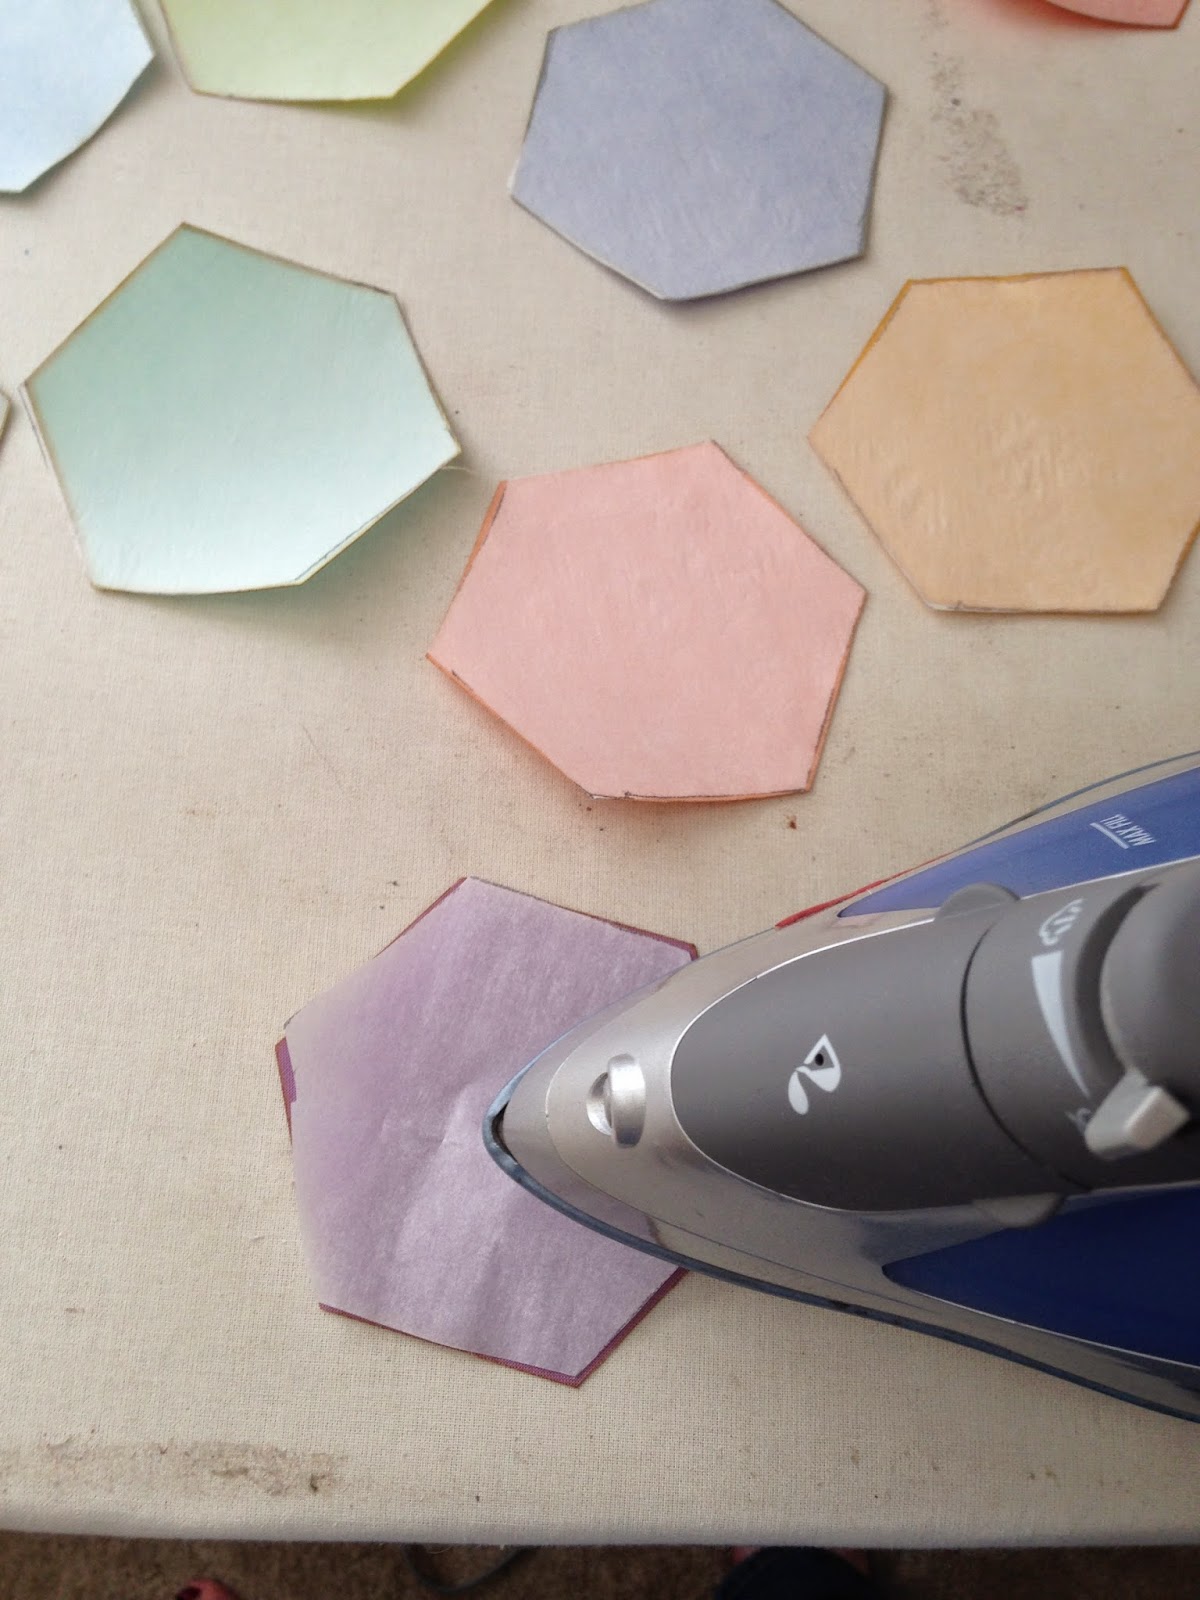
Once you have one done, continue doing all the rest of your hexagons as well.
Now carefully peel off the paper backing of the Heat N Bond. Be careful you do not take the sticky webbing with it. I peeled one or two and actually had to stop and re-iron because some areas just didn't adhere as well.
Once I had the backs pulled off, I decided on which hexagons I wanted to use on which pillow fronts, and laid out my pattern.
Now again, be sure the weird waxy side is down, and the right side of your fabric is up. Carefully iron on your hexagons where you want them to go.
Once your done ironing them all in place, it should be a nice smooth pillow front.
Do the same thing for your other pillow front or fronts.
Now head over to your machine and find an applique stitch you like or want to use. I typically take my zig zag stitch and make it smaller and tighter.
I then find a corner to start in and use my lock in stitch (or you can back stitch) and then carefully stitch around your hexagon. Be sure to double check where your needle is when you come to a corner. Needle needs to be on the right side of your fabric if you are turning that direction, and your needle will need to be on the left if you are turning that direction. If you are unsure, use a piece of scrap fabric and practice first. Be sure when you are turning to have your needle in the DOWN position.
Continue appliqueing all your hexagons onto the front of the pillows.
Now time to assemble the pillow; grab the back panel for your pillow (in my case I used a solid white 18in x 18in square. Place both fabrics right side together. In other words, place the back of the pillow with right side of the fabric facing towards you and place the pillow front with the hexagons on it facing down.
Next pin the two pieces of fabric together. I like to start in the corners, and then pin about every 4 inches or so.
I have a serger, so I serged the edges of my pillow. If you do not have a serger, you can do this with a straight stitch and then add a zig zag around that to help make the pillow stronger. I have kids so the serger is my lifesaver!
Start in the middle of one side of the pillow, sew around the entire pillow, leaving about a 3-4inch hole. Notice the hole I am marking between my pinky and thumb.
This is the hole, now carefully flip the pillow inside out. I start with the corner and slowly move from one corner to the next.
Keep pushing all the fabric through and be sure to push the corners out so they are a nice rounded corner.
You now should have a pillow that is wrinkled and still has a hole in it!
Take your pillow cover over to the iron, fold the pieces of fabric (where the hole is) in towards the inside (of your pillow) and iron that down, making a nice sharp line where your seam is. This will help you when you hand sew the pillow closed. Finish ironing the rest of the pillow so its not all wrinkled.
Now you should have two pretty pillow covers!
Time to stuff them!! I use a cheap poly-fill. You can purchased pre-made pillows, or the more expensive poly-fil. I don't mind the cheaper stuff since I have kids.
The amount of stuffing you will need is kind of up to how full you want your pillows. I like my pillows full but not so full they are hard, but not so little that they flop all over the place.
Now you will need matching thread, pins, a hand sewing needle, and some scissors. Pin the hole shut, and thread your needle. I like to thread my needle and use the two strands with the knot at the end. Two is better then one right!
I then place the knotted end on the INSIDE of the pillow. Then carefully use an invisible stitch to close the pillow. Remember how you ironed this part, thats where those iron marks come in handy. Follow the ironed edges to make your invisible stitch perfect.
Finish the pillow off by tying 3 knots and slip the knots inside the pillow if possible.
Now you have two super cute pillows, and it only took a few hours!
Hope this tutorial helped bring some color to your room, or gave you a wonderful idea for your next project.
Now go lay down and enjoy those pillows,
Sarah
To get started you will need enough fabric for the pillow size you want to make. I made TWO: 18 inch by 18 inch pillows. Thats 4: 18 x 18 pieces of fabric. If your fabric is 36 inches wide, then you will only need a yard of fabric. if your fabric is shorter than 36 then you might need more, or you can change the size of the pillows according to the fabric you want to use.
Once you have the fabric and your pillow fronts and backs cut out, then find your hexagon fabric or buy pre-cuts. I had pre-cuts sitting around, so I grabbed a few from the pile. (I used these PRE-CUT hexagons).
Once you have the hexagons cut out, take a piece of Heat N Bond and make a template for slightly smaller then the hexagon. Then cut out and make however many more you need. I had 11 hexagons, so I made 11 cut outs of hexagons from the Heat N Bond.
![]() |
| This is one of my hexagons with my Heat N Bond cut out. |
The next thing you will do is read the instructions carefully. The Heat N Bond has two adhesive sides, and you'll want to make sure you do this correctly. (If not you can gunk up your iron or ironing board). Take the Heat N Bond and place the non paper side onto the wrong side of your hexagon fabric. Carefully iron the paper down onto the hexagon. I start in one corner and move across and out slowly.
![]() |
| Ironing on the Heat N Bond. |
Now carefully peel off the paper backing of the Heat N Bond. Be careful you do not take the sticky webbing with it. I peeled one or two and actually had to stop and re-iron because some areas just didn't adhere as well.
Once I had the backs pulled off, I decided on which hexagons I wanted to use on which pillow fronts, and laid out my pattern.
![]() |
| Pillow #1 |
Now again, be sure the weird waxy side is down, and the right side of your fabric is up. Carefully iron on your hexagons where you want them to go.
Once your done ironing them all in place, it should be a nice smooth pillow front.
Do the same thing for your other pillow front or fronts.
![]() |
| Pillow #2 |
| Pillow #2, ironed on. Yes I changed the design. |
Now head over to your machine and find an applique stitch you like or want to use. I typically take my zig zag stitch and make it smaller and tighter.
I then find a corner to start in and use my lock in stitch (or you can back stitch) and then carefully stitch around your hexagon. Be sure to double check where your needle is when you come to a corner. Needle needs to be on the right side of your fabric if you are turning that direction, and your needle will need to be on the left if you are turning that direction. If you are unsure, use a piece of scrap fabric and practice first. Be sure when you are turning to have your needle in the DOWN position.
![]() |
| This is a finished hexagon. |
![]() |
| Pillow #2 Done |
![]() |
| Pillow #1 done. |
Now time to assemble the pillow; grab the back panel for your pillow (in my case I used a solid white 18in x 18in square. Place both fabrics right side together. In other words, place the back of the pillow with right side of the fabric facing towards you and place the pillow front with the hexagons on it facing down.
Next pin the two pieces of fabric together. I like to start in the corners, and then pin about every 4 inches or so.
I have a serger, so I serged the edges of my pillow. If you do not have a serger, you can do this with a straight stitch and then add a zig zag around that to help make the pillow stronger. I have kids so the serger is my lifesaver!
Start in the middle of one side of the pillow, sew around the entire pillow, leaving about a 3-4inch hole. Notice the hole I am marking between my pinky and thumb.
This is the hole, now carefully flip the pillow inside out. I start with the corner and slowly move from one corner to the next.
Keep pushing all the fabric through and be sure to push the corners out so they are a nice rounded corner.
You now should have a pillow that is wrinkled and still has a hole in it!
Take your pillow cover over to the iron, fold the pieces of fabric (where the hole is) in towards the inside (of your pillow) and iron that down, making a nice sharp line where your seam is. This will help you when you hand sew the pillow closed. Finish ironing the rest of the pillow so its not all wrinkled.
![]() |
| Folding the seams inward, and ironing them down. |
Now you should have two pretty pillow covers!
Time to stuff them!! I use a cheap poly-fill. You can purchased pre-made pillows, or the more expensive poly-fil. I don't mind the cheaper stuff since I have kids.
![]() |
| Start stuffing those pillows. |
Now you will need matching thread, pins, a hand sewing needle, and some scissors. Pin the hole shut, and thread your needle. I like to thread my needle and use the two strands with the knot at the end. Two is better then one right!
I then place the knotted end on the INSIDE of the pillow. Then carefully use an invisible stitch to close the pillow. Remember how you ironed this part, thats where those iron marks come in handy. Follow the ironed edges to make your invisible stitch perfect.
![]() |
| Pinned. |
| Invisible stitch. |
| Hole done. |
![]() |
| Pillow #2 DONE!!!! |
![]() |
| Pillow #1 DONE!!! |
Hope this tutorial helped bring some color to your room, or gave you a wonderful idea for your next project.
Now go lay down and enjoy those pillows,
Sarah
Labels:
applique,
color,
decor,
hand made,
heat n bond,
hexagon,
hexagon pillow,
living room,
pillow,
pillow covers,
sew,
thro pillows
Subscribe to:
Posts (Atom)