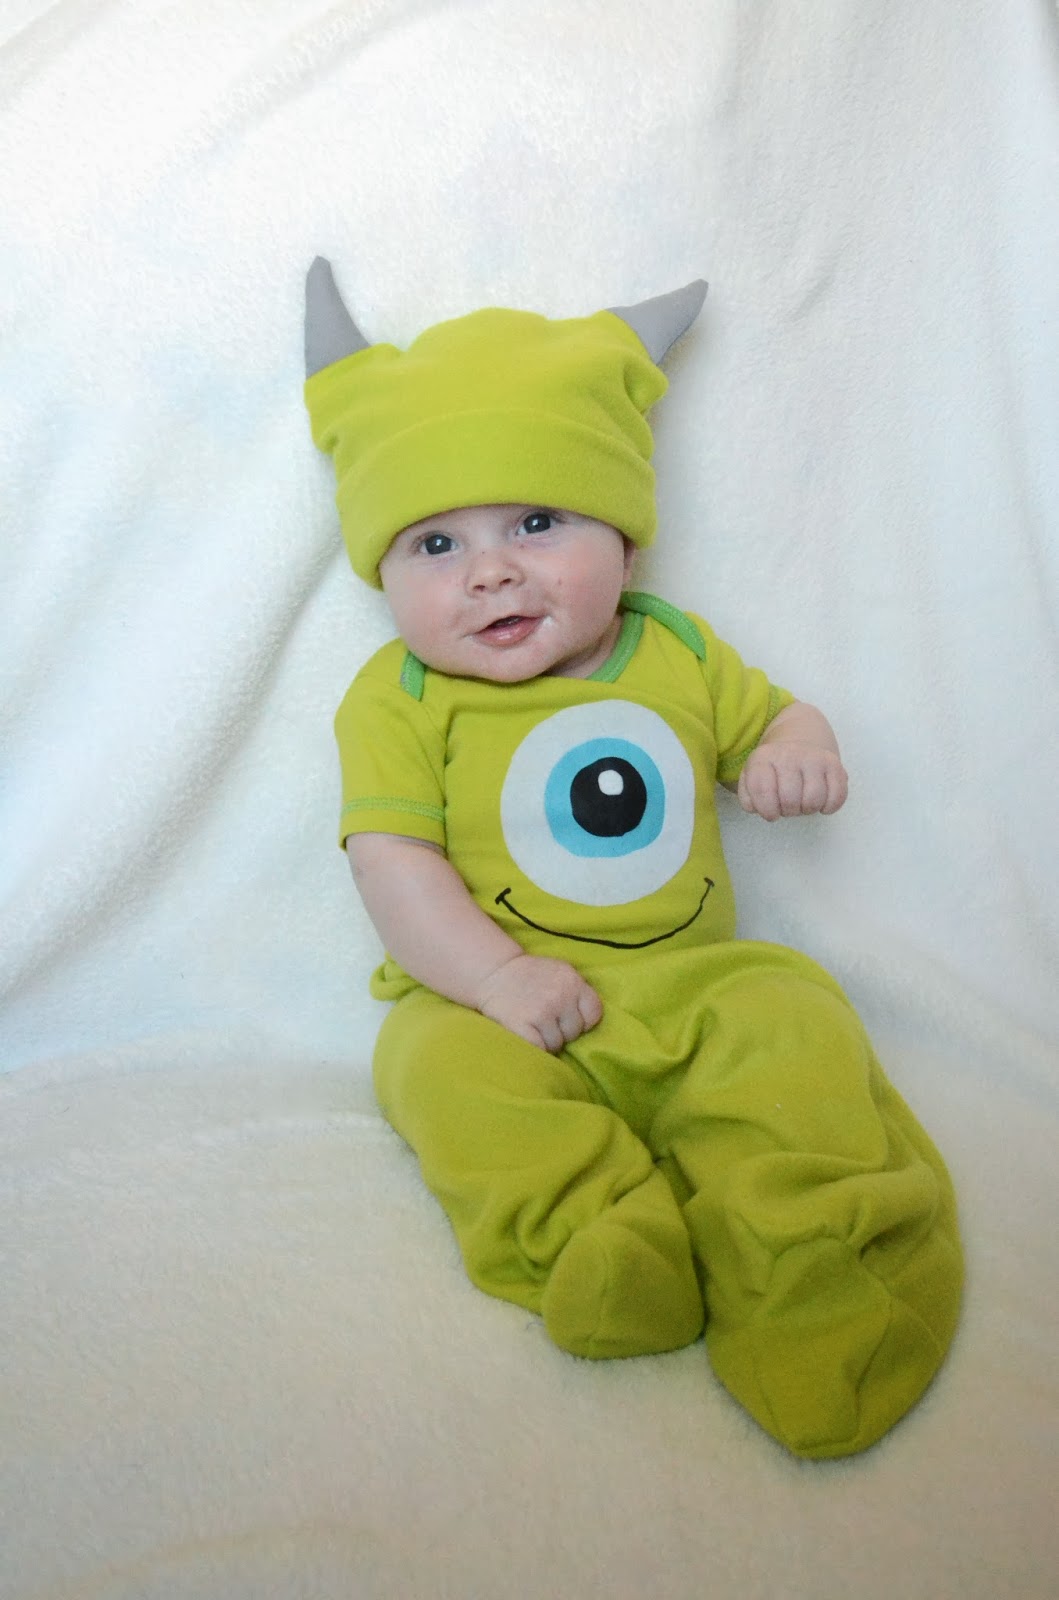
My youngest son, this year, for Halloween was Mike Wazowski, from Monsters Inc. We have a onesie from when my oldest son was little. The onesie has Mike's eye on it, and its all lime green. However, when my oldest wore it, it was summer time. October was cold most of the month so I wanted to make sure he was warm and not cold, as he is still really young. With that being said, I wanted to make the onesie warmer. I decided I would add some pants and a hat (which will add the horns that Mike has into the costume). In this blog post I will show you how I made the pants and how I made the hat with the horns in it. I figured somewhere, sometime, someone will more then likely want to make this outfit. All the other tutorials I found were nothing like I wanted, they were big balls, or something super uncomfortable for an infant. So, below you will find the picture tutorial of how to make a Mike Wazowski costume step by step.
To start you will need the following:
Fabric:
~about 1 yard of lime green fabric
~a very small piece of grey fabric
Other Tools:
~Freezer Paper
~Scissors
~Ruler
~Iron and Ironing Board
~Pencil
~Pants that fit your child
~A hat that fits your child/or the measurements of his/her head.
~ 1/2 or 3/4 inch elastic (about a yard)
and the rest of your usual sewing items (machine, matching thread, etc.)
1. Take your freezer paper and place the pants on top of it. When using the freezer paper, the waxy side always faces down, and the paper like side is the side you will draw your pattern on, or as I call it, the right side.
2. Trace with your ruler around the pants, right along the seams. Then on the waist line add two inches to the top and draw a line. Along the ankles add 1.5 inches, and draw a line. On the left and right sides add one inch and draw a line.
3. Cut out the pattern.
4. Now you have the right leg done, so flip the pattern right side down, and trace onto another piece of freezer paper. This will be your left leg pattern.
5. Cut your Left leg out.
6. Now you have the leg patterns for your pants.
7. Now grab your lime green fabric (mine is a fleece), and fold it over (so you can cut 2 pieces at the same time.) Lay your pattern for one of the legs on the fabric.
8. Take your iron and iron the freezer paper down onto the fabric, just enough so the freezer paper sticks to the fabric.
9. Now cut out the pattern, cutting through both pieces of fabric. You can take your material over to the cutting board, and use your rotary cutter if you want. My fabric was very smooth, and slipped around a lot, so I felt better with the scissors. NOTE: I also pinned the paper to the fabric after this photo, before I cut. This helped keep everything in line.
10. Once you have the pattern cut out, do the same on the other leg pattern as well.
11. Slowly peel the freezer paper off the fabric. It should come off without harming the fabric at all!
12. Now take one set of the pants, a left leg and a right leg. You will now sew the center (crotch) pieces together.
13. Pin the center (crotch) pieces together. I typically pin the top two corners together, then the bottom (crotch) corners together, then in between pieces. That will just help make sure your pants line up perfectly.
14. I then serge the center (crotch) piece together. If you don't have a serger, you can use a straight stitch or even a zigzag.
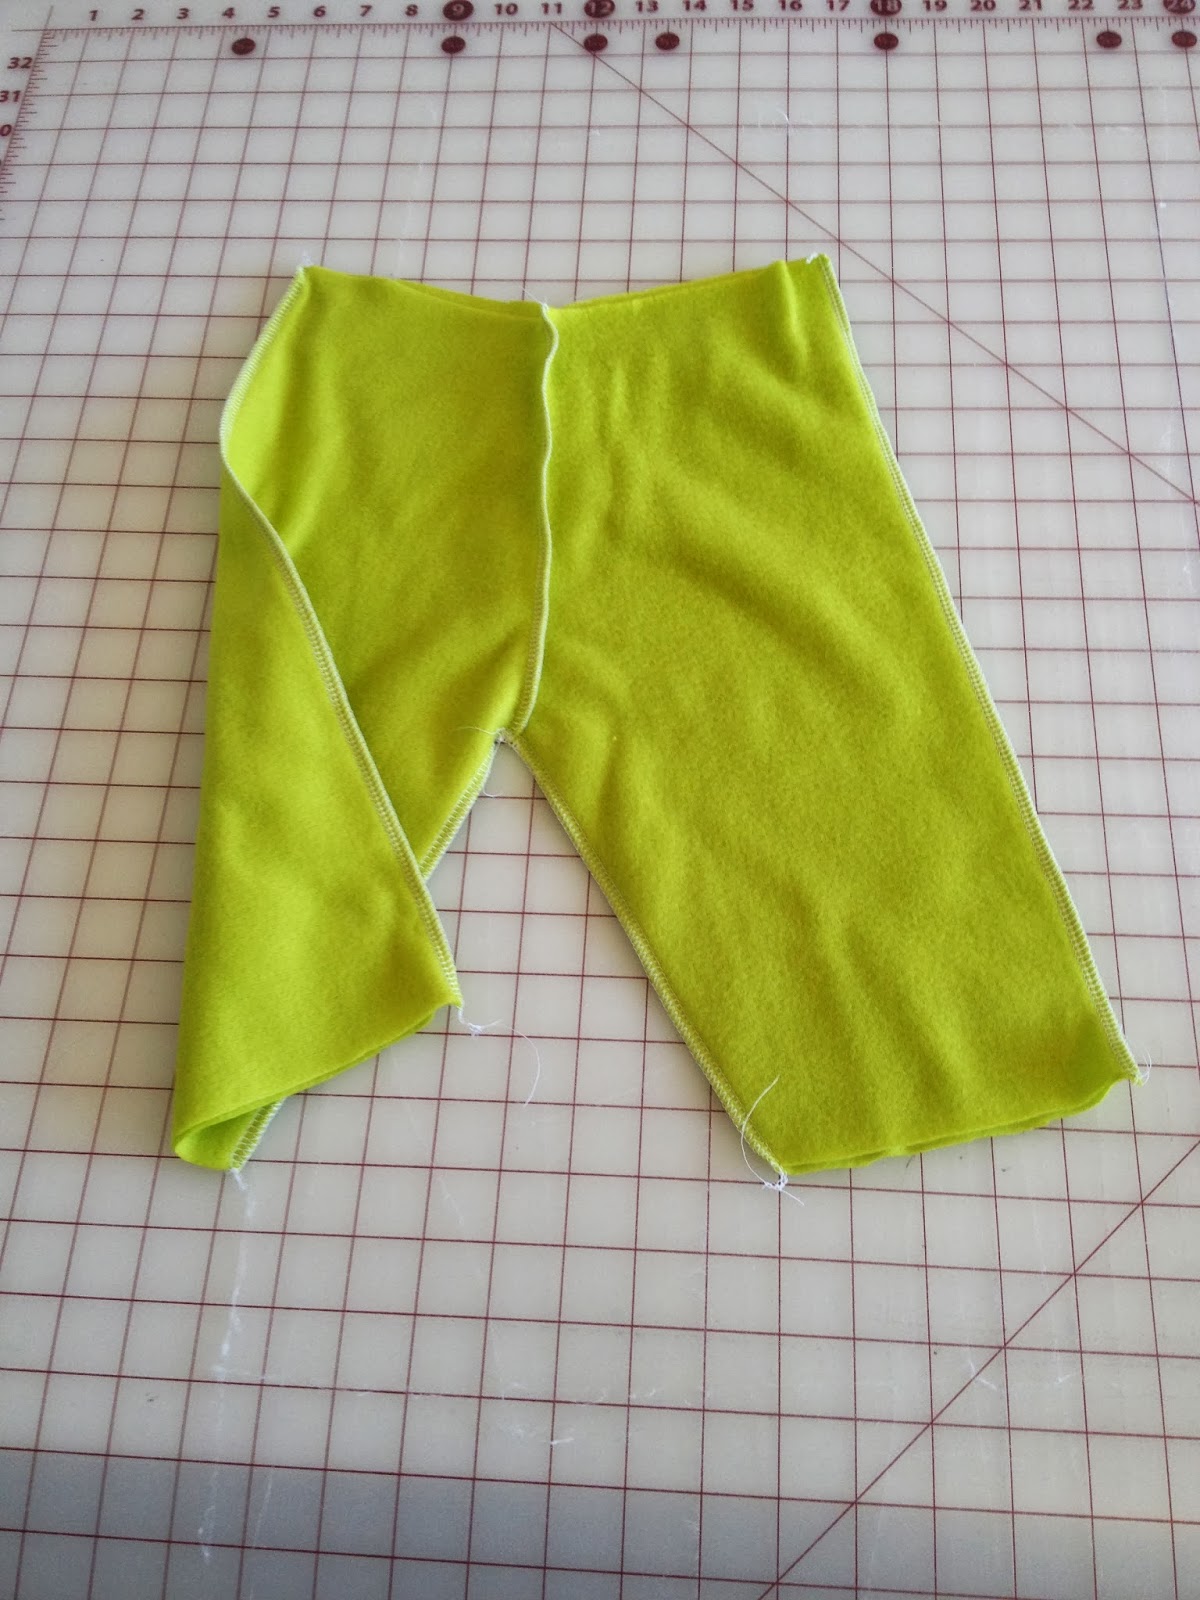
15. Do the same thing to the other pair of left and right legs. When you are done, you should have something that looks a lot like this:
16. With right sides together place the two pairs on top of each other. You now are going to pin from the center (crotch) down the inside of the pants. You should pin the crotch piece first, by lining up the two seems (the ones you just sewed). Then pin the ankle corners together, and then pin the area in between. You might have to smoosh or move fabric around to help get the lines all matched up.
17. When you have done that, you should now have something that look a lot like this:
18. Now you need to pin the sides of the pants; again, pin the top corner and bottom corner and then everything in between.
19. Once you have sewn the sides, the pants should look somewhat like pants!
20a. Now I need to square out the top of my pants, to create a straight edge to fold over.
20b. Cut the straight edge. (If you have a straight edge, then skip this step).
21. Fold the waist over an inch. This is why you added the extra two inches to the top of your pattern.
22. Now pin the fold, again lining up the seems with the seems and scrunching everything else in between.
23. Remove any extra pieces to your sewing machine, so that you have the smallest amount of machine left. This will help you as you are about to sew in a circle.
24. Slide the pants onto your machine. You should have your machine inside the pants waist. Begin sewing, then do a few back stitches. If your elastic is 1/2 inch or 3/4 inch then be sure to sew at the 1 inch mark on your machine. NOTE: I am using a walking foot. The reason being that I am using fleece, and also its thicker fabric so the feet on the bottom and the feet on the top help keep everything aligned.
25. Leave a small hole about an inch wide, and remember to back stitch.
26. You can now flip your pants inside out if you would like. They should look something like this now!
27. Now take a safety pin, and connect it to the end of your elastic. NOTE: I pre-measured my sons waist. I simply took the elastic, stretched it around his waist, and marked it with a marker; but don't pull too tight. I did not cut off the extra elastic yet, as I will need that when I am feeding it through the pants.
28. Begin feeding the elastic with the safety pin as your guide through the hole.
29. Scrunch up the material, and then pull it down the elastic. Continuing on until you have come back around to your hole again.
30. Pull the safety pin back through the hole. Now, I always double check to make sure my elastic did not twist while I was pulling it through. I then find my mark that I made and cut about a half inch further to give room for the sewing.
31. I then line up the ends where my mark is (its on the underside, I apologize for that).
32. Use a zig zag stitch and attach the two ends together. Go over the two pieces several times to make sure they wont break.
33. Push all the elastic into the pants, and flatten out the fabric where the hole is. Go back to your machine, and using a straight stitch to seal up the hole. Remember to use a back stitch at the start and end.
34. The finished waist with your hole sewn, should now look like this. I use this as the back of the pants, where the tag of your pants would be. You don't want to see all that back stitching on the front of your costume!
Now that you have finished the pants, time to add the feet to the pants.
35.Take one of the legs and use it as a guide for your foot top. Place it on some freezer paper, as you see I have done with a little scrap freezer paper I had.
36. Now trace a semi-circle from one side of the pant leg to the other.
37. I found the center and traced a guide. Now take that center line and fold your freezer paper. This will ensure you have a perfect semi-circle.
38. Now make your semi-circle darker, and cut along that line.
39. Now this is your perfect semi-circle.
40. Now you need a foot piece. This is the base, where the little baby foot will rest. You can use a sock, a shoe, or measure the little baby foot and add a little inch or so. I simply measured and added a little room. I also traced this on the ruler to help find my center and also keep it even. You will need to know where the center is.
41. Fold on your center and make sure you draw your base clearly, and cut.
42. You now should have a perfect base!
43. You will need to cut two bases and two foot tops. I am using the scraps of my fleece to get the most out of it. Here I have ironed on the base and will cut out a second one.
44. Now do the same for the foot top. Again, pictured is one, but I cut two.
45. Heres my two pieces. I placed the base on the bottom, and the foot top on top of the base. Pin both centers (center of the base and center of the top).
Once you have the center pinned pin down the sides of the top to the base. I stopped about 3/4 of the way down the base.
46. This is what you will have once its all pinned down.
47. Now stitch along the pinned side. I used my serger and serged the edge. Remember I only wanted to sew 3/4 of the foot, I left the back of the foot open.
48. Now lay the back of the foot against the pants. You are going to pin the BASE of the foot to the bottom of the pant leg.
49. This is what it will look like once its pinned.
50. Once you have it pinned, sew the back of the pant leg to the BASE of the foot pieces. Be sure to not catch any of the other pieces (like the other leg or the top.)
51. Now pin the front of the leg (pants) to the top of the FOOT piece (the rounded one). Pin it well, as you will have a lot of scrunching going on.
52. Then stitch along the pinned area, and do your best to catch the correct pieces. Don't catch the other leg or base pieces. Go slow and take it one stitch at a time.
53. Once you have it stitched flip the leg inside out and make sure you don't have any holes! You should have something that looks like this.
54. Sew the other foot onto the other leg, and make sure you sew the base and foot top onto the right sides of the pants! You don't want one foot pointing backwards! When your done you should have these awesome baby pants done!
If by any chance you cant seem to find the onesie heres a few links that might be able to find helpful:
Disney Store
How to Make a Onesie from an Old T-Shirt
55. Ok, now that you have the pants made we can make the hat for it!
To start you will need to measure your child's head. I took a measuring tape and rapped it around my sons head from back to front and then back around to the back. You can also measure from one ear to the other (going over the top of his head) to get the measurement for the arch, but I wanted to fold mine so I added an in or two. Once you have the measurements we can begin!
56. Draw the horns on the freezer paper, and cut them out
57. Draw out your hat pattern. (NOTE: the base of the hat will be HALF of what your child's head measurements were for all the way around. I added an inch and a half for the fold I wanted to make and also the seams to sew.) Don't forget to add those all in when you are making the pattern. Also if you have a cap already that fits well just add an inch or so on almost all sides, and then trace around the hat.
58. Once you have our pattern for the hat, fold your fabric and place the pattern of the hat on the fold. Note the flat side of my pattern in on the fold of the fabric.
59. This is what you should have after you place your pattern on the fold, and cut it out.
60. You will need two of these, so cut out a 2nd one.
61. Take those horn patterns and place them on our fabric. Again you will need to FOLD the fabric so you have 2 pieces for the left and 2 pieces for the right horn.
62. This is what you should now have.
63. Now with the right sides together for one of the horns, stitch along the edge. I didn't use a specific seam amount, I just tried to get as close to the edge as possible without leaving any holes. Do the same with the 2nd horn.
64. You should now have two horns that look like this:
65. Now flip the horns inside out. I used a dull pencil to help me get the points pushed out.
66. I then placed the two hat patterns right side together, and using my measuring board placed the horns and equal distance from the tops center.
67. I then stuffed the horns with polly-fill, and made sure I didn't over do it; as I still needed to stitch around the hat.
68. Now pin the entire hat pattern and horns all in place.
69. I serged the entire hat, leaving about a 2 inch hole. You can straight stitch and then zig zag stitch if you don't have a serger. Remember to leave the hole. Place the hole on the opposite side as the horns, along the curved side.
70. You now should have something that looks like this. Using the hole, flip the entire hat inside out through the hole.
71. You should now have something like this. Make sure you don't have any other holes, if you do just flip the hat inside out again and restitch in those areas.
72. Now fold inward the hole and pin. Top stitch along the hole.
73. You now should have a small top stitch along the opposite side of the horns that looks like this. Don't worry you wont see this in a few seconds!
74. Push the side with the hole inside the side with the horns. You Now have something that looks like a hat!
75. This is the final look. Note: the hat has a fold, thats where my extra inches along the bottom came in.
Now you have a Mike Wazowski costume!
Feel free to leave comments or questions in the comment section below.
Happy Halloween and Trick or Treat,
Sarah