Please READ over the ENTIRE tutorial. I made the costume, and when I went to try it on my son, my husband asked, "wheres Sully's tail?" I forgot all about his tail. So I had to seam rip the pants and place the tail in the right spot. If you read the entire tutorial, when you make the pants you can add the tail at the right time. I started with the pants, made the top, then the head, and then attached the tail. However, if I was going to make this again I would make the top, the head, the pants and tail, and then at the end attach the top to the pants. I am going to put the tutorial in the order that I made it, but again, you might want to make the pants and tail LAST!! Good Luck!
To start, you will need:
- Blue/teal fleece (about 3 yards, for a 1 1/2 year old. Depending on your child's size you might
need more).
- Purple fleece (a yard)
- Very small amount (like a fat quarter) of each fabric color:
* Grey
* White
* Black
* Light Blue
- Freezer paper
-Velcro or snaps
- A shirt, pair of pants, and a sweater with a hood that all fits comfortably on your child.
- Pencil, rulers, scissors, and all other sewing tools (machine, pins, etc.)
Ok here we go:
1. Supplies you will need:

2. The patterns I cut out using a shirt and a pair of pants that were perfect on him (not too small, not too short, not too big, etc.). I traced them on the flat side of the freezer paper, added about a half inch to all inseams, and about one to two inches for hems, etc. If you need help with this pattern making you can check out google, youtube, or pinterest. I also can make a tutorial, if anyone leaves a comment below.

3. With my pants patterns, I start by folding my fabric so I have TWO layers of fabric. I then iron on my freezer paper to the fabric.

4. I then pin the freezer paper to the fabric, because I am using fleece and it tends to move a little when cutting it.

5. Once you have the 4 pieces cut out, you should have something that looks like this:

6. Then you will pin the inside crotch seam together. Pin the fabric with right sides together (I'm working with a fleece that doesn't have a wrong side... so I just pin and sew). This is the area where your "fly" or zipper would be, and the butt crack area. Does that help? (NOTE: if you make this in the correct order, this is where you would be adding the tail, you would be inserting it in the butt crack area. You would not sew the back pieces together, until after you have the pants done and the tail ready!)

7. Once you have sewn them together, it should look like this:

8. Time to add Sully's dots. He has purple dots all over his fur, except on his belly. I just cut random blobs out from my purple fleece. I then laid them on my pants, staying about 3 inches away from the hip/waist, and about an inch or so from all sides, or hem areas. Less layers to sew through.

9. I used a PURPLE thread, that matched as close to the fleece as possible. I also used a walking foot, as that will help feed the fabric from the bottom and top. I stitched the dots on with a top stitch around the entire blob. I tried to stay about 1/4 of an inch from the edge.

10. This is what the pants front and back should now look like:


12. Once you have that pined, sew the pants together with a half inch seem (I used my serger), Be sure the crotch area doesn't have any holes, and that you sewed everything together.

13. Now line up the sides of the pants, starting by pinning the top and bottom, then everything in between.

14. Sew them together.

15. You now should have a full pair of pants. (NOTE: if you are making them in the correct order, your butt crack piece should not be sewn together).

16. Flipped inside out, this is what they should look like:

Now, you can set those aside and move over to the shirt. (NOTE: if you are doing this in the correct order, START here). When making this pattern with the freezer paper, you need the front panel of the shirt, and 2 back panels. The two back panels need to overlap so you can place velcro or snaps in place. I simply made a pattern of HALF the back of the shirt, and then added about an inch and a half to it and drew another line. So the first line would be the left side and the 2nd line would be the right side of the back. Look at the photo of the pattern, below, and you will understand better.
1. This is the pattern pieces. One is the front, the back pieces, and the arms.

2. This is the front of the sully costume. Notice, I folded my fabric in HALF, placed my pattern on the fold and ironed it down. This will give me a front panel that is mirror image, or in other words perfect!

3. I then cut out the front panel.

4. This is the back panel. Notice the line down the right side. The line is the right side of the back, this is the left side. I ironed this piece down, on one layer of fabric. I then cut this piece out.


5. I then placed the same pattern back on my fabric, ironed it down only to the line.

6. I then folded the freezer paper along that line so I then can have the second back panel.

7. I then cut this panel out, and you should have something like this:

8. For the arms you will need to fold the fabric over, iron the pattern down, and cut the two layers. This will give you the left and right arm!

9. You should have two arms.

10. Now, place your two back panels (as shown in the photo- the bottom two pieces), and then place the front panel on top. Line up the shoulders so they are together.

11. Pin the shoulders together.

12. Sew the shoulders together, using about a half inch seam (I used my serger).

13. This is what you should now have (this is looking at it from the back).

14. Sully has spots all over his back, but not his stomach. So, I cut a few blobs of purple out, placed them randomly all over his back two panels, again avoiding sides, and hem areas, and then pinned them down into place.

15. Pin all the blobs down, some might require more then others!

16. Again, sew the blobs down with PURPLE thread, as close to the purple fleece color as possible. Top stitch about a 1/4 of an inch from the edge of the blob.

17. For the front panel, since this is his stomach area, I just placed a few blobs on the sides.

18. When you have all the blobs sewn together, your top should now look like this:

19. Now flip it back so that all the right sides are together. This is the back of the shirt/top.

20. Line up the sides, from the armpit to the waist area. Pin the sides down, and sew those areas. Note: I pinned the opening of the back together so it didn't accidentally get caught in the sides.

21. This is now what your top should look like:

ARMS:
Time to add the arms/sleeves.
22. Grab your two arm pieces.

23. Cut out your purple blobs again, and add them randomly to the arms, again; avoid the seams, or hem areas.

24. Again, using a PURPLE thread, top stitch about 1/4 of an inch from the edge around the blob.

25. Now fold one of the arm piece, right sides together, and pin along the opening. Do NOT pin or sew the top or bottom.

26. When you sew the one arm, do the same with the other arm. You now should have two tube like material pieces.

27. Turn the arms inside out. Placing the larger curved area towards the top (shoulder) of the shirt, and the lower/smaller curved area along the armpit area.

28. Place the sleeve INSIDE the shirt.

29. Pin the top (shoulder), then pin the armpit (line up the two seams), then pin the rest of the arm hole together. You will have to squish the sleeve into the arm area (as seen in this photo).

30. While sewing, make sure the armpit seam and the sleeve seams line up. Also, make sure the shoulder and the top of the curve on the sleeve, match up.

31. Once you have sewn the arm in place, pull it out, and make sure there are no holes. If there are any holes, flip it back inside, and sew them closed. Sew the other arm on exactly the same way.

32. You should now have a top that looks a lot like this:


33. This step is optional, you really don't have to do this, but I did so I could get the hems all lined up.

34. I pined the back panel together, where it lays flat on my son.

35. I then sewed about an inch from the top down. This will just ensure the back panels will sit flat when I add the snaps.

HOOD/HEAD:
Now on to the hood/head piece. My son doesn't wear hats very much, so it wasn't a surprise to me when he could careless to wear the head piece, but after a few tries he wore it for a minutes or two!
1. Take a hood from a sweater that fits your child. Lay the hood on the freezer paper. Trace the hood.

2. Add a chin strap, so you can snap it around his neck/chin area. Notice that I also rounded the top of the hood.

3. I then cut out the hood pattern.

4. Folding my fabric in half, place the pattern on the folded fabric and ironed it down.

5. Cut out the hood pattern.

6. Pin from the back of the hood, up to the opening of the hood front. You will be placing a face on the hood front, so this needs to go down to the eyebrows on your child. If you need to, sew a little, try it on them, and sew more if needed.

7. Don't forget to back stitch, so the hood doesn't come undone.

8. Your finished hood should look something like this. I sewed at about 1/4 of an inch. Try the hood on your child and change any of the measurements if needed. The back of the hood needed to be altered, but that was after this photo.

Now onto the face of sully! Flip the hood inside out, and add the following pieces.
EYES:
1. Cut out two round white circles.

2. Cut out two smaller blue circles.

3. Cut out even smaller black circles.

4. Using a blanket stitch, or zig zag, or even just top stitch; sew the blue circle to the white circle.

5. The eye should look something like this. Make sure you are using thread that matches the fabric you are attaching.

6. Sew the black small circle to the blue circle.

7. Now you have two sully eyeballs.

EYEBROWS:
When I made these I just folded some fabric, and cut the fabric in to the shape I liked. I then laid it on another piece of fabric and cut the same design out again. I wanted to keep it simple, so I didn't use a pattern for most of the face pieces.
1. Cut out two eyebrows.

2. Fold over and sew along the open parts, leaving one small hole to flip and stuff.

3.Sew along the 2 open sides.

4. Leave a hole, to flip the eyebrow inside out.

5. Flip eyebrow inside out and then stuff with polyfill fiber or even some left over batting.


6. You can use your machine, or hand stitch the opening closed. Fold the fabric inwards, to leave a nice clean edge. Pin and sew closed.

This is now what you should have for the face:

HORNS:
Sully does have curved rounded horns. They are a grey color. I found some scrap grey fabric I had on hand, and just simply drew out a pattern that I liked. I didn't use a pattern or anything. Once I had a design I liked I then just cut it out again for two sets of horns.
1. Draw out a design you like, make sure your fabric is folded as you will need 2 pieces of fabric to make ONE horn. Once you have one horn cut out, lay is back down onto another folded piece of fabric and cut out an additional two more pieces. When your done, you should have 4 pieces, which will be 2 horns.


2. Sew along the sides, but leave an opening to stuff the horn. I left the bottom of the horn open because its where I will be stitched it into the top of the hood.

3. Flip the horns inside out.

4. Stuff the horn with polyfill or left over batting.

5. Notice I did not stitch the horns closed, as I will do this once I place them into the hood/head piece. Once you have your horns done, you should almost have his face complete.

TEETH:
I did not use a pattern, again I just measured the head openings, and cut out a design I liked. To keep the teeth mirrored I folded the fabric in half.
1. Fold your fabric in half, and then in half again. If you look closely you can see that the first fold of the fabric is along the bottom, straight edge. The second fold is down the center of the teeth. I did this so the teeth were perfectly mirrored on the other side. I drew the teeth out with a pencil, and the cut from the center of the teeth to the marked amount (which is from the head measurement).

2. I then stitched the folded fabric together, along the open pieces. You don't have to fold the fabric and have this many layers, but I thought it gave the teeth more strength and depth.

3. I then did the exact same thing for the bottom set of teeth. Sully has fang, or sharp teeth along the bottom of his mouth, so I added sharper teeth.

4. Stitch the teeth closed, along the top edge.

COMPLETING THE HOOD:
Time to start piecing the head together.
1. Take the hood, place it on your child or just eyeball it, and pin both eyes into place. I actually put the hood on myself, and pinned the eyes into the spot I liked, then tried it on my son.

2. I used a simple blanket stitch, but you can always use a zig zag or even just top stitch around the eyes.

3. The eyebrows: again I just eyeballed it, I placed them where I liked, pulled out the old needle and thread, and hand stitched the eyebrows into place. (Because you stuffed the eyebrows it would be hard to get them under a machines foot.) Just simply put a few stitches on the right, one or two in the center (along the back), and a few on the left.


4. Lay the hood as flat as possible. Make sure the eyes, and eyebrows are as lined up on both sides. You will now be placing the horns into place. Lay the horns where you think they would look the best.

5. Once you have a spot for the horns, cut through both layers of the hood, large enough for the horn to go through, but not too big.

6. Pull the horn through on one side, and using your hand on the underside, pinch it into place.

7. Flip the hood over, and pin the 4 layers together (two hood pieces, and the horn fabric). Hand stitch, or if you can get this under a machine, stitch the hole closed.

8. I was able to get mine under my machine, and just did a straight stitch at first, but then went back over it with a zig zag. Repeat with the other horn.

9. Take the hood, where the upper teeth will be placed, and fold the hem inward. If you need to pin this feel free to do so. I personally just eyeballed it and sewed it as I went along.


10. I then pinned the upper teeth to the top of the hood. The hood has a center, and the teeth do as well, try to pin those two centers together.

11. Stitch the teeth on with just a simple straight stitch, or zig zag, which ever makes it easier for you.

12. You should now have a hood that looks something like this.

13. Now back to your child, place the hood back on their head, and wrap the chin piece into place. Mark with a pencil or pin it, into place, where it would be snapped closed. (I used a pin).

14. I then started pinning the teeth from the center to the left, back to the center and towards the right. However, the full row of teeth don't fit along the fabric, and this is where the overlap of the head pieces happened. I simply marked it on the overlapped fabric, cut the teeth, and stitched that small piece onto the front part. (see in the photo below, theirs a yellow pin, thats where I placed the teeth that are behind the yellow pin.)

15. I then top stitched them into place, including that random small piece. Again, you can use a straight stitch or a zig zag, either one will work.

16. This is what the bottom teeth look like on the first piece of fabric. Notice the random last teeth are missing. They will be sewn onto the other part of the head. Now, you might not need to do this, as your child's head might be larger. Or you might have to sew even more teeth onto the other side, because your child's head is smaller. Keep in mind that your bottom teeth might not look exactly like mine.

17. Heres the last piece of the teeth, notice the yellow pin, marking where I need to start the teeth. Again, straight stitch, or zig zag stitch the teeth into place.

18. Now you have finished the head (mostly). You should have something along the lines of this. NOTE: I did not remove the yellow pin and it will help guide me on where to place the snaps (or you can use velcro).

19. Sew the bottom of the hoods hem. Once again you can pin this, or just wing it like I did.

20. When you are finished, you should have something like this.

21. Finish the sides of the chin strap, just like your hems.


PUTTING IT TOGETHER:
Now its time to put the shirt, and the pants all together.
1. Take the pants and shirt that you made earlier.

2. Flip the shirt inside out, so the dotted fur is now on the inside, and slide the pants with the dots facing out into the shirt. In other words, place the right side of the shirt and the right side of the pants together, and line up the pants waist line, and the shirts waist line.

3. Try to center the pants with the shirt. Once you have done that, pin the center of the backs together, the sides together, and everything in between.

4. Pin the one side of the back flap first.

5. Overlap the other back flap, and pin that in place.


6. Stitch carefully along the edge. You can do a straight stitch and then go back over it with a zig zag stitch. This will be the waist of the outfit, so make it strong!

7. This is what you should now have, flip the outfit inside out, try it on your child, adjust the pants and shirt as needed, and make the alterations.

8. You almost have a costume!

PUTTING THE DETAILS IN PLACE:
Time to finish up the smaller details:
1. Hem the sleeves. Place the top on your child, pin the sleeve in place where it needs to be, and stitch it down.


2. Lay the sleeves together, lining them up from the shoulder seams. I did this because my child would only let me fold the one sleeve, and not the other. I basically used my folded, sewn sleeve as a guide for the other sleeve. You can do this as well, or just get both sleeves pinned while on your child. My way might be easier, as kids don't really sit still.

3. Once done, your sleeves should now look like this or something like this. I just used a simple straight stitch to hem the sleeves.

CLAWS:
Sully has claws on his hands and his feet. I made templates for them as I need a lot. You will need a front and a back for each claw.
1. Make a claw for the hands, and a claw for the feet. The one for the feet should be a little bigger.
NOTE: Sully has 4 claws on each hand, and 3 claws on each foot. So you will need 8 claws for the hands, and 6 claws for the feet, total.

2. Cut out the pattern, fold the fabric (grey), and iron down your patterns. Either trace them onto the wrong side of the fabric or cut them out, peel them up and iron them down again, cut them out, and so on and so on...

3. Once you have them all cut out, you should have 2 sets of claws for the feet, and 2 sets of claws for the hands. (feet are on the left, and hands are on the right)

4. With right sides together, stitch around the edge of the claws, leaving the bottom open so you can flip them inside out. Repeat for ALL the claws.

5. Flip all the claws inside out.

6. Pin the claws all into place, and stitch them down. I used a straight stitch, right along the same line as the hem. This is the sleeve/hand claws.

7. You should now have something like this.

THE PANTS:
Again, try this on your child, mark where you will need to hem them, and fix as you need them to be.
1. Try them on, pin them, for both pants (if you can). Sew with a straight stitch around the ankle piece, on both legs, cut off any extra material that can get in the way.

2. Place the claws along the top of the ankles, pin into place, and stitch the claws down where you hemmed the pants.

DETAILS:
Sully has spots on his head TOO?!?!?!!? Crap....
1. Cut out small purple circles, and place them in areas around the hood. Pin them, sew them with a straight stitch as close to the edge as possible. Be sure to not sew the other piece of the hood, while doing this!

2. Finished dots!

TAIL!!!!!!
The part I screwed up on. Here I am with the costume (as done above), and I walk down stairs to my son and husband. I place my son in his costume, and as my son is running around enjoying it, my husband says "Wheres his tail?" DANG IT!!!! Sully has a tail? Sully HAS a tail! GRRRRR
I stomp back up stairs, with the costume, and get BACK to work on making the tail. Heres where you would make this before, and insert it into the pants, before you close them up!
1. Fold your fabric in half. On the opposite side of the folded fabric, cut a triangle shape. (My fold is on the right, and I cut from the left top of the tail, to the bottom of the tail.)

2. Open up the tail triangle you just cut, and place a bunch of those purple dots on the tail.

3. Sew those into place.

4. Now on to the tail spikes. I cut out large to small diamond shapes (or just fold the fabric and cut triangles). Place the center of the diamonds down the center of the tail.

5. Sew JUST the CENTER of the diamond onto the tail fabric, with just a simple straight stitch.

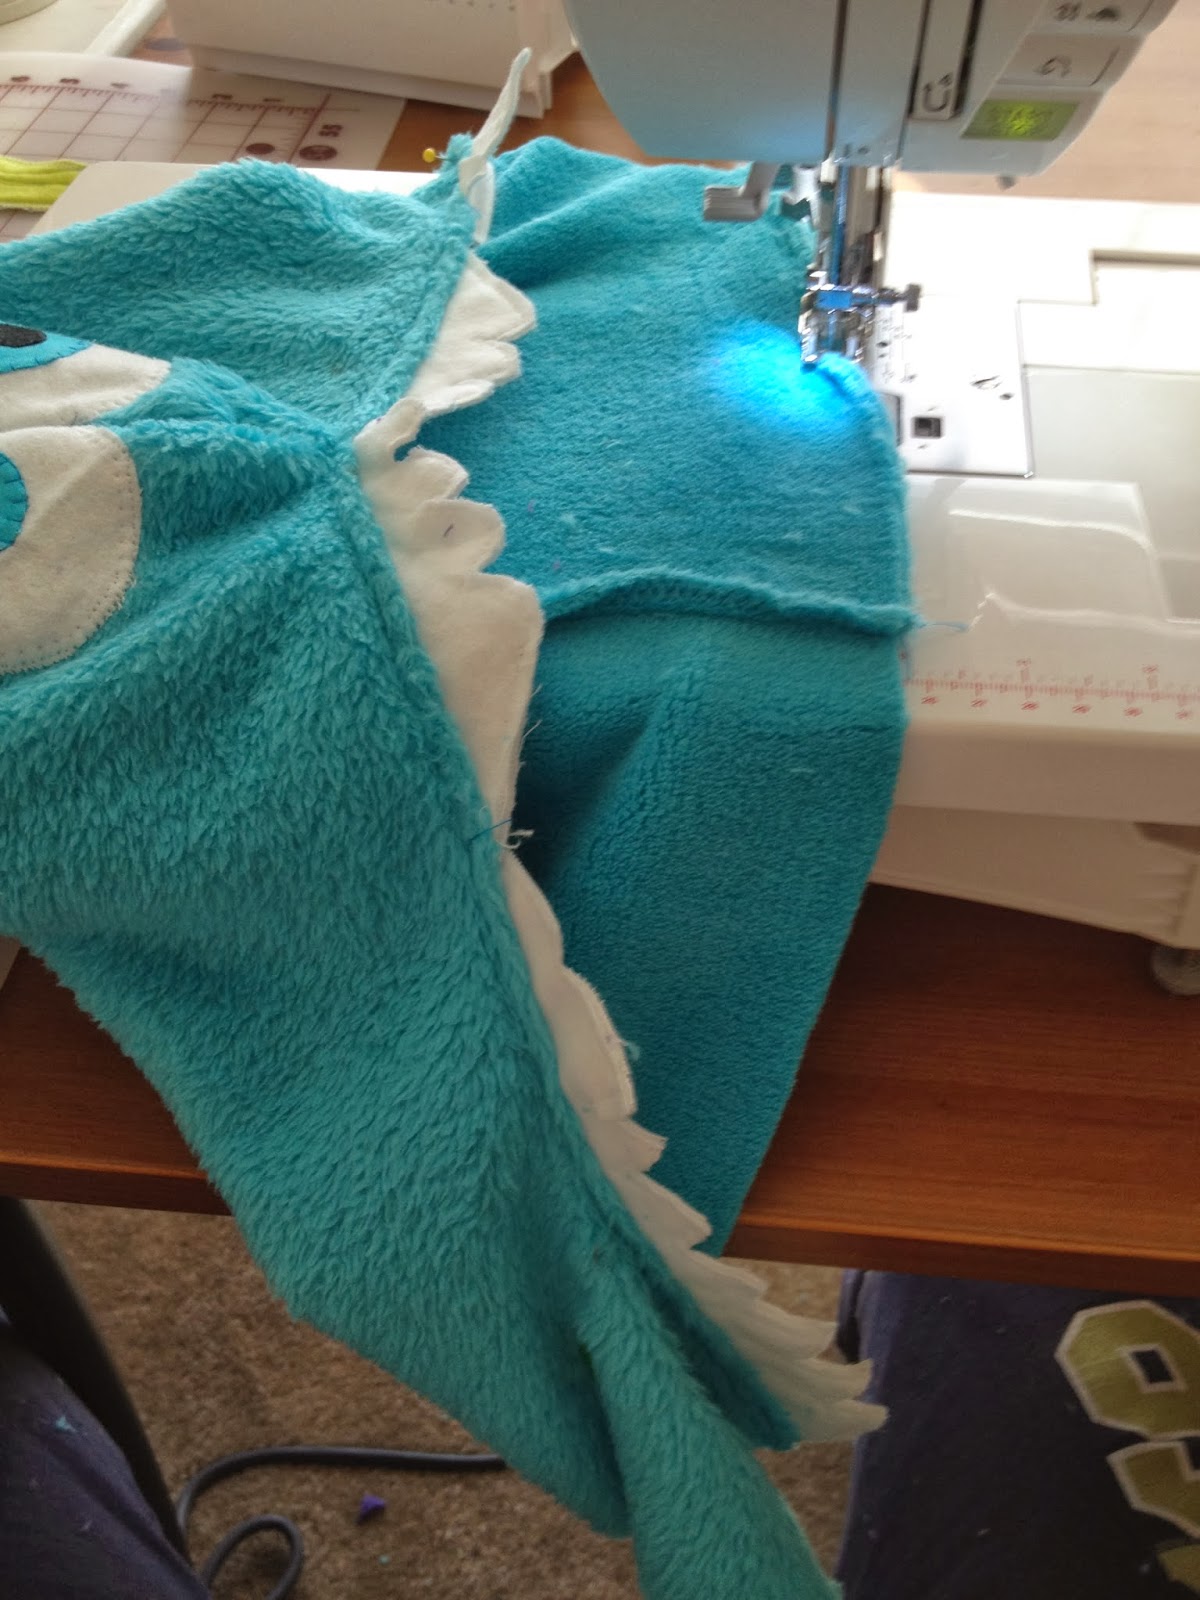
6. You now should have something like this (below). Place both parts of the diamond together, making the triangle. Pin it together.

7. Carefully straight stitch the two triangle pieces together along the edge.

8. Continue down the entire tail, until you have something like this.

9. Pin the triangle spikes down towards the center of the tail. So you don't accidentally stitch them into the side of the tail.

10. Close the tail, lining up the triangle sides, with right sides together. Pin the tail together (leaving the top open).

11. Once you have sewn the tail together, carefully flip it inside out, and pull all the pins out of the spikes.

12. Stuff the tail as you want. You can stuff it so its very stiff, or stuff it so its slightly limp. I went for a happy middle, not to stiff but still squishy enough that when he sat down it wasn't annoying.

13. Heres where I had to SEAM RIP the back butt part of the pants. I seam ripped from the waist down, only big enough for the tail to fit in. If you are doing this the correct way, you will already have this hole.

14. CAREFULLY sew the tail and pants back together. Make sure the spikes are facing the correct way, otherwise you will be seam ripping more then you want to. Once I checked to make sure the tail was in correctly I straight stitched, then zig zag stitched again, to ensure it would not come undone!

LASTLY:
1. Grab your snap tool and snaps, or velcro and place them in the spots along the back of the shirt opening to hold it closed. I simply placed the outfit on my son, marked with a marker where I needed the snaps, and placed them in their place. Make sure to do the same with the hood/head piece as well.


Heres the finished costume in action:
 |
| During our mini photo shoot. |
 |
| Mini photo shoot. |
 |
| Both my cranky boys together! |
 |
| Walking around on Halloween, 2013. SULLY! |
 |
| Myself and my SULLY on Halloween (a day after my knee surgery). |
If you have any questions, feel free to leave them in the comment area below. Also, if you end up making this costume, I would love to see photos of them!
Happy Costume Making,
Sarah
2 comments:
Amazing! Really thank you so much for so many details!
This is an excellent tutorial for making Sully costumes.
Post a Comment