Pages

Showing posts with label hand made. Show all posts

Thursday, January 8, 2015

More Handmade Cards

I enjoy ever second I spend on making cards. It has been a great way to use my scrapbooking paper, stickers, and tools up. I love adding a little quilting into it as well. Not to mention the amount of money I have saved by using what I have.

The first card below, I made was for my mother's birthday back in October. I made a wall hanging for her, and wanted a card to match the theme and colors. The fabric in the wall hanging was floral and the theme was a vintage apron. She said she wanted an old vintage style apron, as a gift. Since I am not local and can not take measurements of my mother, I decided to add a little humor into my quilting and make a mini wall hanging of a vintage apron.

This is the cover of the card, its purple with a quilted floral diamond and gem style cover.


I used a bright colored floral paper for the inside. Using matching letters I added "Happy Birthday Mom!" I also have the press on/transfer quotes, and the one I added really went well.


The back, I used the diamond quilted paper pieces, and added my "handmade" touch.


Another card I enjoyed making was for a family friend having their very first baby (girl). I love anything baby! I enjoy making burp cloths, baby blankets, and baby pants/shorts. Anyways, I had a ton of really girly stickers and paper, so I cut a few onesies out, added a few stickers and ribbon, and of course a gem or two.

Yes I did cut those onesies out, no punch, they are not stickers, and I did not buy them.

The back of the card:


The inside, I added some very girly stickers, gems and a punch of color.


This last card was for another new mom, also having a girl. I had fun making her card, and tried my hand at a baby carriage. I also did a little tutorial on how I made it.

First thing I did was cut a circle the size I wanted the carriage to be. I need it to have a flat side, and also open like a card. I folded my paper in half, and placed my circle on the folded paper. I then slid my circle down slightly off the fold for the flat bottom of the carriage. Trace your circle and cut.


Once you have it cut, you need to measure out the opening of the carriage, or where the hood would end and the handle bars will be.


Trace and cut that window out.


I then placed my carriage on top of a white piece of scrap paper. I drew a pretty handle (you can do this as unique as you want).


Cut out two of those handles and glue one on the front and one on the back.


I then added wheels, detailed paper, and a few stickers. This is where you can have fun and add all the gems, colors, bows, ribbons, etc.


Once all the glue dried, I added a fun flower, and a few stickers.


Don't forget the inside, and that can be as simple as a little decorative paper.


Heres the back, with my handmade signature.


The finished baby quilt with the matching handmade carriage card.


If you are on a tight budget, and have a ton of stickers, or scrapbook paper available, this is a great way to use those items up, save you TONS of money, and say you care because you spent time MAKING their card!

I love when everyone says, "this card is so cute", "I love this card".... It makes it just that much more sweet, as you invested more time.

Give a Gift,
Sarah

Friday, September 5, 2014

Hand Made Cards

With our tight budget, and being on such a limited amount of spending money each month; I found I could spend almost $10 on just two cards. Seriously, when did cards turn into this extremely expensive piece of paper we give each other and then throw away? I remember buying cards that were .99 cents. I mean, where did those all go?

Well, thats when I started to think, maybe I should just MAKE the cards. That way I could personalize each card for each person. How fun would that be!? I was so excited, so I set off to do some research, check out all the unique stuff I could attempt, and began using what I had, instead of buying a bunch of cards.

I have a ton of scrapbooking product that I have slowly been using for birthday parties and small projects around the house or for family and friends. I had pretty much everything I needed in my craft room. I even had stickers for most occasions and if I didn't, I could find tons of cut outs online.

The first card I made was for my Mother, for Mother's Day (sorry Mom, I know it was horrible). The next one I made was another Mother's Day card. I had more time to make my Mother-in-laws card as I was sending her card with my Father-in laws card for Father's Day. I looked all over the internet for just anything and everything. I then tried my hand at a flower in a pot... yeah, let me just show you:

I cut out each piece and used a small gem for the center of the flower.

I then added "Happy Mother's Day" with stickers I had on hand.

For my Father-in-law and my husband they both got these adorable cards:

This card opens from the bottom. I used brads for the buttons on the collar.
My husband and Father-in law both LOVED the cards, and they both said that it was pretty cool. Like father like son right? Even my oldest son was like "cool, shirt".

My Brother-in-laws birthday is the day after mine, and my sons birthday is late June. The last few posts have been about my sons birthday party and all the items I made for it. However, I didn't show off the card or show you the card I gave to my Brother-in-law for his birthday. Check the out:

This is the card I gave to my Brother-in-law. I felt it was fun, and classic for a California guy.

The inside, I wrote "Happy Birthday", but wished I had done it with stickers.

For my son, his party was nautical themed, so I just matched the theme.

The inside, so cute.

The back, with the "hand made by: Sarah Pitcher". Feels great to make a card for someone special.
I just loved how everyone who has received their cards, has mentioned how great they are, and how personal they seem. Which is why I like making them, but hey, my wallet is liking it too. I have spent zero dollars on these cards so far. I have used stickers, paper, scissors, brads, glue and sticky tape from my scrapbooking supplies. Its just great to finally be putting it all to use.

In July my sister and my brother both have birthdays. I was so excited to do one for my family! I wanted to see what they thought of my card making skills.

My sisters card, I wanted it to be colorful, and seem fun and full of cheer for her birthday. I always hate the fact that I can't be there to celebrate with them, because were military and we rarely can be in town for those events. However, now that I can make cards more personal, I felt like maybe it will make her feel like I am giving her a hug when she opens it. Sure enough, my sister said she LOVED the card.

It says "Happy Birthday Rachel!"
The triangles are only glued at the top, so they are loose and flip up on the end, which gives them that movement, and makes them feel more alive.

This card opened from the bottom and I added a few strips of colored paper.

I added some stickers to add a little visual accent, and I wrote a personal message inside.
 My brothers card, I again used those vintage cars, and cut each one out. I then cut out banners in two different paper colors, and glued them all together. I then alternated the directions and the card really came out masculine but super cute. I could totally change the colors to pink purple and maybe a soft yellow, and find flowers or something they like; and then it would be a perfect female card as well.


The cars are from fabric I had used for a project awhile back.

The inside quote went well with the idea of riding in a car.

Like all my other cards I have been adding this too the backs.
I made two more birthday cards in August for my Mother-in-law and my Father-in-law. I am starting to get better at this card making stuff, and really wanted to do some fun bold cards. I went with a little more modern style and also went with clean lines and a simple design. I mean, how do you not like this card:

This card is a lot more pink and purple then the colors show. I believe its the lighting.
 The idea was to make a cupcake. I hope everyone can see it?

I had some birthday stickers, which I loved the cake, because it matched the colors of this card perfectly.

The back, of course, had its touch.
 This card is a light pink with sage green diamonds. However, the colors are just not that bold in the photo... use your imagination. Bad lighting, next time Ill try to get better photos.

For my Father-in-law, I went with a fun tiered cake.

I just used different paper with different themed designs on them, and cut them into a cake.

I then used a velum quote and added the brown frame around it.

I cut out 3 curved pieces of paper, stacked and glued them together, added some stickers and it all came together nicely.

Had to add the detail to the back.
I wanted to make a few cards for the future, but only got around to one. Hey, I had some sewing projects I wanted to work on more so. Anyways, with everyone graduating this summer, I thought Ill make a graduation card.

I kept it blank on the inside for now, who knows when I will use it, but I sure do love it.
The tassel on the hat is made from embroidery floss. I again, have tons of that on hand.

Well, thats all the cards for now. I have a few more birthdays, and of course some holiday cards to make; so keep an eye out for those too. If you want to see a TUTORIAL or a few HOW TO photos, feel free to leave a comment and I'll do my best to make a few.


Give Your Next Gift a Handmade Touch,
Sarah

Tuesday, July 15, 2014

Hexagon Pillows

I am desperate to change my living room decor. One way to start is to add some color. I hate how dark our couches are; even though a few years ago I loved them. I want to make or buy a slipcover for them, but for now a quick pillow project will help bring some bright colors to the room. This project only took a few hours and the results are beautiful.

To get started you will need enough fabric for the pillow size you want to make. I made TWO: 18 inch by 18 inch pillows. Thats 4: 18 x 18 pieces of fabric. If your fabric is 36 inches wide, then you will only need a yard of fabric. if your fabric is shorter than 36 then you might need more, or you can change the size of the pillows according to the fabric you want to use.

Once you have the fabric and your pillow fronts and backs cut out, then find your hexagon fabric or buy pre-cuts. I had pre-cuts sitting around, so I grabbed a few from the pile. (I used these PRE-CUT hexagons).

Once you have the hexagons cut out, take a piece of Heat N Bond and make a template for slightly smaller then the hexagon. Then cut out and make however many more you need. I had 11 hexagons, so I made 11 cut outs of hexagons from the Heat N Bond.

This is one of my hexagons with my Heat N Bond cut out.

The next thing you will do is read the instructions carefully. The Heat N Bond has two adhesive sides, and you'll want to make sure you do this correctly. (If not you can gunk up your iron or ironing board). Take the Heat N Bond and place the non paper side onto the wrong side of your hexagon fabric. Carefully iron the paper down onto the hexagon. I start in one corner and move across and out slowly.
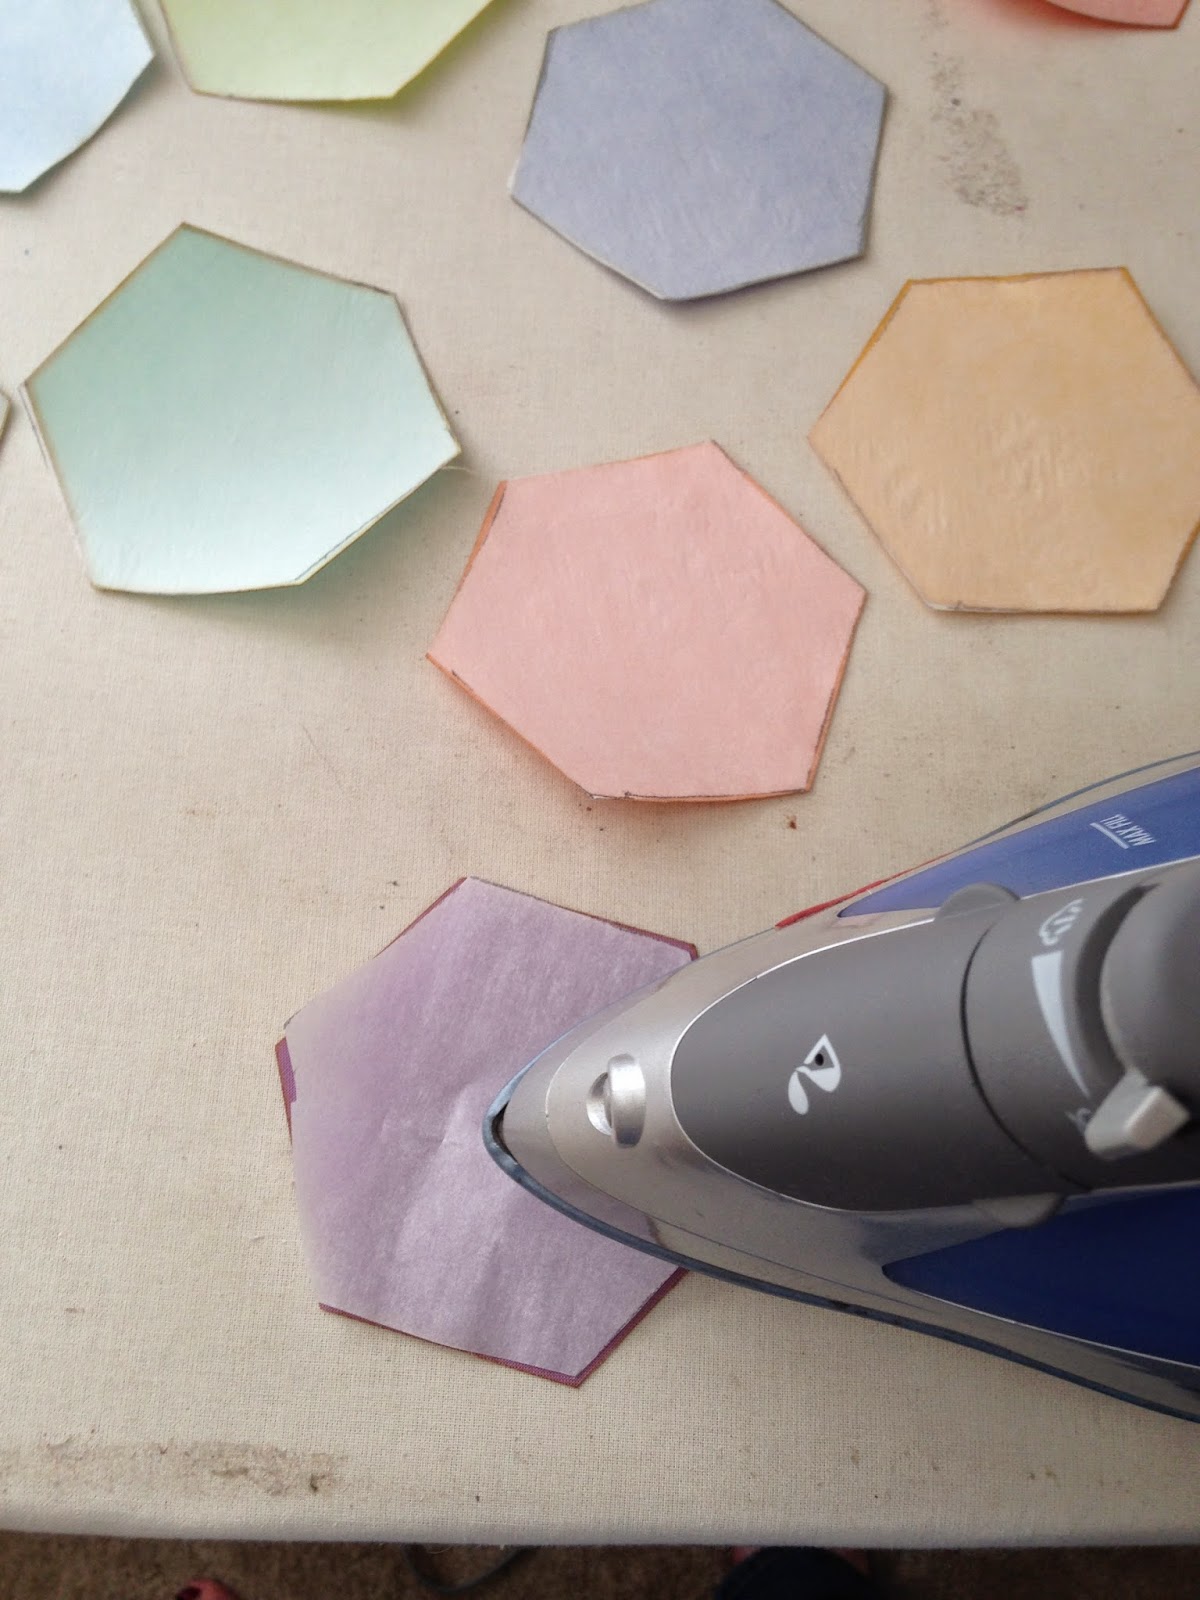

Ironing on the Heat N Bond.
Once you have one done, continue doing all the rest of your hexagons as well.


Now carefully peel off the paper backing of the Heat N Bond. Be careful you do not take the sticky webbing with it. I peeled one or two and actually had to stop and re-iron because some areas just didn't adhere as well.


Once I had the backs pulled off, I decided on which hexagons I wanted to use on which pillow fronts, and laid out my pattern.

Pillow #1

Now again, be sure the weird waxy side is down, and the right side of your fabric is up. Carefully iron on your hexagons where you want them to go.


Once your done ironing them all in place, it should be a nice smooth pillow front.


Do the same thing for your other pillow front or fronts.

Pillow #2

Pillow #2, ironed on. Yes I changed the design.

Now head over to your machine and find an applique stitch you like or want to use. I typically take my zig zag stitch and make it smaller and tighter.


I then find a corner to start in and use my lock in stitch (or you can back stitch) and then carefully stitch around your hexagon. Be sure to double check where your needle is when you come to a corner. Needle needs to be on the right side of your fabric if you are turning that direction, and your needle will need to be on the left if you are turning that direction. If you are unsure, use a piece of scrap fabric and practice first. Be sure when you are turning to have your needle in the DOWN position.


This is a finished hexagon.
Continue appliqueing all your hexagons onto the front of the pillows.

Pillow #2 Done

Pillow #1 done.

Now time to assemble the pillow; grab the back panel for your pillow (in my case I used a solid white 18in x 18in square. Place both fabrics right side together. In other words, place the back of the pillow with right side of the fabric facing towards you and place the pillow front with the hexagons on it facing down.

Next pin the two pieces of fabric together. I like to start in the corners, and then pin about every 4 inches or so.


I have a serger, so I serged the edges of my pillow. If you do not have a serger, you can do this with a straight stitch and then add a zig zag around that to help make the pillow stronger. I have kids so the serger is my lifesaver!


Start in the middle of one side of the pillow, sew around the entire pillow, leaving about a 3-4inch hole. Notice the hole I am marking between my pinky and thumb.


This is the hole, now carefully flip the pillow inside out. I start with the corner and slowly move from one corner to the next.


Keep pushing all the fabric through and be sure to push the corners out so they are a nice rounded corner.


You now should have a pillow that is wrinkled and still has a hole in it!


Take your pillow cover over to the iron, fold the pieces of fabric (where the hole is) in towards the inside (of your pillow) and iron that down, making a nice sharp line where your seam is. This will help you when you hand sew the pillow closed. Finish ironing the rest of the pillow so its not all wrinkled.

Folding the seams inward, and ironing them down.


Now you should have two pretty pillow covers!


Time to stuff them!! I use a cheap poly-fill. You can purchased pre-made pillows, or the more expensive poly-fil. I don't mind the cheaper stuff since I have kids.

Start stuffing those pillows.
The amount of stuffing you will need is kind of up to how full you want your pillows. I like my pillows full but not so full they are hard, but not so little that they flop all over the place.


Now you will need matching thread, pins, a hand sewing needle, and some scissors. Pin the hole shut, and thread your needle. I like to thread my needle and use the two strands with the knot at the end. Two is better then one right!

I then place the knotted end on the INSIDE of the pillow. Then carefully use an invisible stitch to close the pillow. Remember how you ironed this part, thats where those iron marks come in handy. Follow the ironed edges to make your invisible stitch perfect.

Pinned.

Invisible stitch.

Hole done.
Finish the pillow off by tying 3 knots and slip the knots inside the pillow if possible.

Pillow #2 DONE!!!!

Pillow #1 DONE!!!
Now you have two super cute pillows, and it only took a few hours!


Hope this tutorial helped bring some color to your room, or gave you a wonderful idea for your next project.

Now go lay down and enjoy those pillows,
Sarah