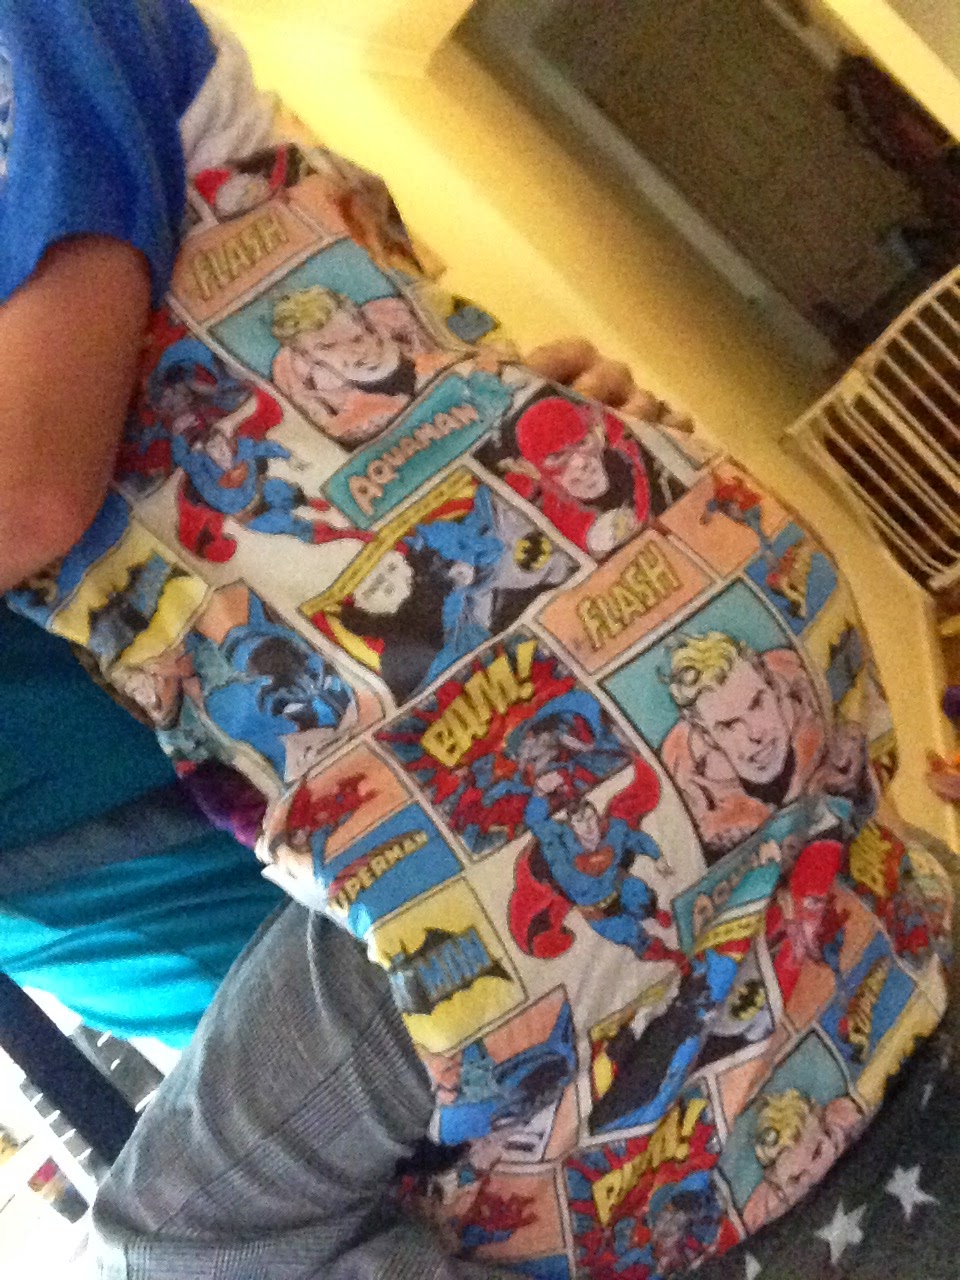
All our babywearing mamas wanted a quick tutorial on how to cover a tula with unique, different or stylish fabric. Brita offered to make a quick tutorial, with a few photos along the way, for all of us to enjoy. If you end up using this tutorial, be sure to show off your before and after photos, as we love to see all our other mamas DIY projects.
Now time to get to that awesome tutorial we promised you... enjoy!
Step 1: Trace out your tula onto a piece of paper. Making sure you mark where the straps come out of.
Step 2: Lay
the trace out over one piece of lining and the piece you want on the
reverse (so your second choice fabric as this will be reversible). Pin together and cut out leaving enough around room around for the seam and to turn out (what I left seemed perfect)
Step 3: Now
do the same for your main fabric and lining but this time you need to
add extra for the tabs on the side and bottom where you will apply the
Velcro to join the two pieces together. I have folded the tabs over to
show the lining so you can see what I mean. I just guessed this bit.
Wide enough to put a piece of Velcro and the length of the gaps between
where the straps join.
Step 4: Now sew the pieces together. The main piece with
its lining, and the reverse side with its lining. Make sure the right sides
are together. Then turn them inside out and stitch around the edge to
keep in place.
Step 5: Join the top of your pieces together along the top.
Make sure you mark where to stop sewing so it isn't joined where the
shoulder straps come out. Put the two right sides facing each other to
sew.
Check how the size is before adding anything else.
Step 6: Now line the two pieces together to put the Velcro on. Pin in place and check it over the tula and with a child in if you can. This picture shows where the Velcro is in the lining of the reverse
fabric and the Velcro goes on the tabs on the good side of your main
fabric and folds in to attach.
Here it is finished.
No you can't
access the pocket or hood but you could add a hood to go on top. I
didn't bother as my toddler never naps.
This covers all parts of the
tula except a tiny bit at he buckles on the waist and I also made
suck pads, twice the normal length, to cover most of the shoulder straps.
Excuse the 7 year old model. My usual model was out with daddy.
Thank you to Brita for sharing this quick tutorial. I hope all our babywearing mamas love it!
Babywear In Style (or a New Style),
Sarah (and Brita)
Showing posts with label ergo. Show all posts
Wednesday, November 5, 2014
Wednesday, October 22, 2014
Give Thanks October, Week 3
October 15:
Today I had to make a run to my favorite craft store to buy fabric for a client, that craft store is the ONLY place I know that sells a childhood candy I just love. Thankful that today, after a long day and week, I was able to grab myself a bag of those candies. YUM!
October 16:
Thankful that I finally finished these Christmas blocks, and I now can send them out to swap! YAY!
October 17:
Today I got to try a new sewing project. I have made car seat strap covers before, so those are nothing new, but the Tula/Ergo strap covers/suck pads are. I am thankful that a friend let me try them out, and make her some (she gave me all the material), and hopefully she loves them!
October 18:
I am so thankful for such an open and loving/caring group of wonderful woman (and men) who are willing to come out and share in our baby wearing/cloth diapering love! Its a great thing. I am finally feeling more at home here in Norther California.
October 19:
Potty training has not been easy in this house, but I am thankful that my son is getting back in to it. Crossing my fingers that he wants to potty train, and be a big boy!
October 20:
So thankful I finished the boys Halloween costumes. Totally was worried I would be up sewing them the night before Halloween!
October 21:
I am so thankful that my neighbors let us watch their little dog, Porsha, while they are on vacation; Porsha makes my day just that much better. She cuddles with me, and wants me to love on her, and when I stop she licks me and pretty much makes me love on her some more. I miss having dogs, and I am so lucky to have Porsha in my house, she is a loving, caring, and sweet little dog.
Give Thanks,
Sarah
Today I had to make a run to my favorite craft store to buy fabric for a client, that craft store is the ONLY place I know that sells a childhood candy I just love. Thankful that today, after a long day and week, I was able to grab myself a bag of those candies. YUM!
October 16:
Thankful that I finally finished these Christmas blocks, and I now can send them out to swap! YAY!
October 17:
Today I got to try a new sewing project. I have made car seat strap covers before, so those are nothing new, but the Tula/Ergo strap covers/suck pads are. I am thankful that a friend let me try them out, and make her some (she gave me all the material), and hopefully she loves them!
![]() |
| Tula/Ergo suck pads |
![]() |
| Carseat strap covers |
I am so thankful for such an open and loving/caring group of wonderful woman (and men) who are willing to come out and share in our baby wearing/cloth diapering love! Its a great thing. I am finally feeling more at home here in Norther California.
October 19:
Potty training has not been easy in this house, but I am thankful that my son is getting back in to it. Crossing my fingers that he wants to potty train, and be a big boy!
October 20:
So thankful I finished the boys Halloween costumes. Totally was worried I would be up sewing them the night before Halloween!
October 21:
I am so thankful that my neighbors let us watch their little dog, Porsha, while they are on vacation; Porsha makes my day just that much better. She cuddles with me, and wants me to love on her, and when I stop she licks me and pretty much makes me love on her some more. I miss having dogs, and I am so lucky to have Porsha in my house, she is a loving, caring, and sweet little dog.
Give Thanks,
Sarah
Wednesday, August 6, 2014
DIY Baby/Toddler Carrier
My first son was very independent and never wanted to be held or picked up much. He was walking at 9 months and hasn't stopped since. So, when I had my second child, I was shocked at how much he loved to sit with me, cuddle with me, and wanted me to hold him. I finally got tired of picking him up and only having one hand to do everything else. It was time to look into some type of carrier.
I research every carrier I could think of, and studied how they looked, were made, the style, and the measurements. I finally decided on how to make one. I told my husband I needed to head out this weekend and look for some large and small buckles for the carrier. He mentioned he had an old military backpack that I could use the buckles, straps, and anything else I wanted off it. I was wondering what he meant, but then he brought it to me and I saw clearly what he was thinking.
I seam ripped the shoulder straps off the back pack, and even removed the waist belt buckle off it as well. I then did the following:
I cut out 2 panels of fabric (large enough to hold my 1 year old and 2 year old), you might need to do some measuring of the kids from shoulder to under their bums. Add a few extra inches to the bottom so the waist buckle can connect to. I simply measured the waist buckle and added that many inches onto my two fabric panels.
I then place both shoulder straps inside the two fabric panels. Both fabric panels were right sides together. I then serged the shoulder straps and the top of the fabric panels together. I then had something like this:
I then serged around the lower half on both sides (again right sides together) and the bottom. Leaving two holes on the sides where your shoulder straps will attach (under your arm pit).
I then took the waist buckle (which, once it was removed was actually two pieces), I needed to sew the waist pieces together. I used a zig zag stitch back and forth a few times, to piece the waist buckle together. I tested it out by pulling on both ends with my own strength. It held, so I continued on.
This is a close up view:
Of course, no one wants to see that hot mess; so I took some left over military fabric and covered it up.
I then placed it on the outside of the carrier and pinned it to the fabric panels.
Again using zig zag stitches I attached the waist buckle to the carriers main fabric panels. I again went over the waist buckle SEVERAL times with my zig zag stitch. I did enough passes to break a needle!
I then tried it on, and pinned the shoulder straps under my arms where I wanted them to rest.
I then zig zag stitched them inside the open holes I had on each side. I folded the fabric inside to leave a nice clean edge.
I then had the carrier! Almost done!!
After I tried it on and put the kids in it, I grabbed a small buckle off the backpack (which had about 100 buckles), and attached them on the shoulder straps (along my chest area). The shoulder straps already had hooks for the buckle pieces to loop through, you might have to make some or simply loop them around the shoulder straps and sew them on.
I also re-enforced the connection where the shoulder straps meet with the top of the two fabric panels. I only serged the inside, so I went along the edge and added more zig zag stitches to help keep the kiddos safe.
It even worked as a front carrier when little man needed extra snuggles.
Yes I went hiking with it!
He passed out!
At a party, and he needed a nap! (NOTE the zig zags on the shoulder straps where they are inserted into the two fabric panels... re-enforced).
My two year old after being crazy upset and cranky in target, I strapped him in and he fell asleep instantly!
In the end I spent $3 total to make this carrier. I used the straps and buckles from the old backpack, I used an old military blouse (from my husband) to make the military panel, I had the mink on hand from a previous project, and the $3 was spent on buying matching THREAD!!! Yep, I could have easily skipped that purchase but felt it would make the carrier just that much more professional looking!
I have been stopped several times while out wearing it, and have been asked where I purchased the carrier. Once I informed them that I simply made it, most of them said I needed to sell them. I am instead, posting the tutorial. Hopefully then, someone will be able to spend less then $5 on a carrier.
Good Luck and Share Your DIY Carriers,
Sarah
Labels:
back carrier,
backpack,
buckle,
carrier,
DIY,
diy baby carrier,
diy back carrier,
diy carrier,
ergo,
front carrier,
sew,
toddler carrier,
tula,
tutorial
Friday, June 13, 2014
June Give Thanks, Week 1
June 1:
Today was a little rough. We went out to run errands and my oldest was a hot mess in Target. I am thankful that I had the back carrier, that I made, with us; because I put him in it (after several nasty looks), he calmed down instantly. He almost fell asleep before we got back to the car. I am so happy he fits in it.
June 2:
I still can not believe my youngest is going to be 1 this month, but I am thankful that he is wanting to be more independent and do such things like, feeding himself. Feels great, but a bitter sweet moment too.
June 3:
I am thankful that I actually had time tonight to paint my toes and my finger nails, all while watching one of my shows. Peace and quiet.... its bliss!
June 4:
Today was an awesome day! I am thankful I was able to get so much done! I finished several projects for my sons first birthday, did the laundry, dishes, made dinner, cleaned the car out, returned stuff at Target, did a few errands, and still had time to clean out the boys toys! It was a beautiful day.
June 5:
I am thankful for whatever was in my coffee this morning. Sounds silly, but I literally cleaned the ENTIRE house, did all the dishes AND the laundry. I put everything away, and even had time to clean the microwave (talk about cleaning)! Feels great!
June 6:
Today I am thankful for my best friend. We chatted on skype late last night, and I am so thankful that she is so open with me. I am so blessed to have such a wonderful friend who can be happy with me, sad with me, and listen as well as catch up like we talk everyday (even when we go months without chatting). Thank you Kim!
June 7:
Sometimes, its the simple things in life that we should be thankful for. Today I am thankful for the patience I have, and even though it has taken me years to gain it, I am thankful to have such amazing patience (especially with my kids! Hey we have all been there.)
Give Thanks,
Sarah
Wednesday, May 28, 2014
May Give Thanks, Week 4
May 22:
I am SO thankful for my brilliant and beyond clever husband who came up with the idea of using the straps off a backpack to make a carrier for our second son. The carrier is similar to an ergo. Check it out:
May 23:
Today I am thankful for such an open, caring, and supportive mother. I didn't think I could be so open with her until I moved away and realized how much our relationship has bloomed. She really is an amazing person, and I am sad I didn't take every second I could to take in the knowledge she has/and gives.
May 24:
Thankful for a day in Sacramento at the Train museum! The kids love playing with the train sets and they love running around and seeing all the real trains. Its an amazing museum if you have never been, you should go.
May 25:
Thankful for my 11 month old baby boy! Jared is going to be 1 before I know it. Can't believe how big he has gotten. Such an explorer too.
May26:
Thankful for a day out with our neighbors (we hiked to Beale falls), but sadly I slipped on a rock and re-injured my knee (the one I had surgery on). Our neighbors, James and Paula were awesome, and I am so thankful for their help with both our kids, as they have two of their own too. It was a great hike up, but a rough one back. We all made it back, I got sick and was in a lot of pain, but so thankful for my wonderful husband and amazing neighbors. Everything worked out well, and I have been resting and icing my knee. Crossing my fingers I feel better in a few days.
May 27:
For Mothers Day, my Mom sent me a Starbucks gift card. I am thankful for that one little coffee here and there that I can have without spending any of my cash. I honestly have been on such a tight budget, that I hadn't bought Starbucks in weeks. Feels great to have one again! Thanks Mom!
May28:
Thankful for a little less knee pain today. Hoping that each day is a day closer to feeling normal again. Hopefully this wasn't a bad tear, just a bump in the road. I want to be able to hike those falls again!
Give Thanks,
Sarah
I am SO thankful for my brilliant and beyond clever husband who came up with the idea of using the straps off a backpack to make a carrier for our second son. The carrier is similar to an ergo. Check it out:
May 23:
Today I am thankful for such an open, caring, and supportive mother. I didn't think I could be so open with her until I moved away and realized how much our relationship has bloomed. She really is an amazing person, and I am sad I didn't take every second I could to take in the knowledge she has/and gives.
May 24:
Thankful for a day in Sacramento at the Train museum! The kids love playing with the train sets and they love running around and seeing all the real trains. Its an amazing museum if you have never been, you should go.
May 25:
Thankful for my 11 month old baby boy! Jared is going to be 1 before I know it. Can't believe how big he has gotten. Such an explorer too.
May26:
Thankful for a day out with our neighbors (we hiked to Beale falls), but sadly I slipped on a rock and re-injured my knee (the one I had surgery on). Our neighbors, James and Paula were awesome, and I am so thankful for their help with both our kids, as they have two of their own too. It was a great hike up, but a rough one back. We all made it back, I got sick and was in a lot of pain, but so thankful for my wonderful husband and amazing neighbors. Everything worked out well, and I have been resting and icing my knee. Crossing my fingers I feel better in a few days.
![]() |
| Hiking up to the falls, with my 11 month old on my back; before I hurt my knee. |
May 27:
For Mothers Day, my Mom sent me a Starbucks gift card. I am thankful for that one little coffee here and there that I can have without spending any of my cash. I honestly have been on such a tight budget, that I hadn't bought Starbucks in weeks. Feels great to have one again! Thanks Mom!
May28:
Thankful for a little less knee pain today. Hoping that each day is a day closer to feeling normal again. Hopefully this wasn't a bad tear, just a bump in the road. I want to be able to hike those falls again!
Give Thanks,
Sarah
Labels:
11 month old,
DIY,
diy carrier,
ergo,
family,
friends,
gift,
give thanks,
give thanks 365 days a year,
hike,
knee,
mother,
neighbors,
train museum
Subscribe to:
Posts (Atom)