Pages

Showing posts with label carseat cover. Show all posts

Wednesday, January 1, 2014

The Holidays and Hand Made Gifts

Well, December has come and gone. I had a hundred projects/gifts to make and finish before Christmas Eve and Christmas Day, and luckily I finished MOST of the projects I had on my list.

Lets start with my sister-in-law. She has an, almost, two year old daughter (my wonderful niece). I wanted to make her something she could use for awhile. However, a quilt or a blanket is just so over done for the kids in the family. I then did some looking around, checked pinterest and I came across whats called the pillow dress. I thought about it and it was perfect. She can wear it as a dress, and add the pants I made when she gets a little taller. Then when she grows even more and the pants don't fit anymore but the dress fits more like a shirt, she can wear it with jeans or leggings! I hope she loved it, and when she opened the box she looked happy!


opening one of the boxes


Next was my very own sister. She and her husband are expecting their first son in a few months. I love to make baby stuff, so I racked my brain and tried to figure out what was one thing I use a lot. A carseat cover. Its like a blanket but with straps. It simply covers your carseat and keeps those unfriendly hands off your newborn! Thanks but no thanks dirty finger person. I had some really cute whale flannel fabric, and some grey mink hanging out. I checked my measurements and needed a little extra fabric to cover the small pieces missing. My mother-in-law is awesome, and also sews, so lucky for me she had some scrap mink hanging around. I grabbed some navy blue mink and it worked perfect. I love the end results, it totally looks like a racing strip on a car! Check it out and let me know what you think.

Front
Side

When the bottom is flipped open (back view).
When the bottom is flipped open (front view).

 The last big project I did, and where I got that grey mink from is the quilt I made for my mother. I wanted something warm, large, and unique. Something I haven't done yet. Something that makes you say wow. Again, i checked pinterest for ideas. I looked at modern quilts, old quilts, and hand stitched quilts. After a lot of thought and a trip or two or three, to joanns fabric, I found the perfect jelly rolls to use, and the perfect fabric to go with it. The end result was this:

Front

Back, grey mink

The quilting design I did.

All folded and ready to go!
I also made some small cinnamon ornaments that smelled amazing. I found the recipe on pinterest as well. It worked great and was so much fun to do with my son. It seemed like a lot of our family members liked them which is always a win in my book! I hope next year we can get amazing gifts, or make even better gifts for everyone. I want everyone to be happy with the gifts we give them, but I never can tell how people feel about hand made gifts. I hope you enjoy hand made gifts and I hope you find some inspiration in this post!

Happy Holidays, and happy crafting everyone,
Sarah


Thursday, May 2, 2013

Preparing for the New Addition

If you havent figured it out by now, then let me tell  you a little secret. I am pregnant and expecting our second son! With that being said, I am fastly approaching my due date, and have had this need to make him everything. One of the many items I have been wanting to remake for this son that I hated the first one I made for my other son, is the infant car seat cover. Now, about a year and a half ago I made this one:

Now, whats wrong with it, well let me tell you. One, the straps are too long, so it hung real low into the car seat and in my sons way. Two, I used velcro and it sucked. After one wash it was all full of fuzz and just didnt work well after that. Third, the fabric wasnt very heavy, and so the wind or rain would blow it off the actual car seat and you would be fighting with it, instead of it doing its job! Fourth, It was only one side of fabric, I did not add a lining or inside fabric, so again when I washed it the fabric frayed and little strings were hanging off it. That drove me nuts, so I ended up just taking it off.

This time, I researched a few more designs, thought about what I wanted in the new car seat cover, and went from their. With my old one it hung real low in the front. Which I loved when he was at parties or out running errands and I could tuck the extra under the car seat to keep people from lifting it. I definitely wanted to keep the length. However, i did not want to be stepping on it, or it getting stuck on stuff, like the old one did. So, I needed to make a few changes. Also, we had toys on the car seat handle, and when the cover is on the car seat you cant really put toys on the handle. So I wanted to add hooks or something to inside of this one to provide a place to put the toys!

In the end this is the awesome car seat cover I came up with. I removed the velcro from the equation, put in place snaps, fixed the window design slightly, and added a piece of fabric on the inside for toys.
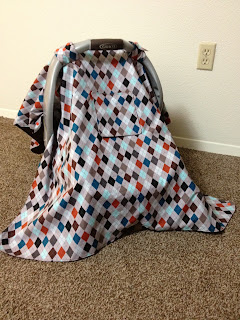
With the front loose.

Front view again.
Front/Side with Snaps in use.

Upclose look at the side snaps to hold the front material in place.

A single snap in the back to keep the back from flying up as well.

Upclose. Note: you can still use the handle to unlock the car seat from its base.

I added hooks on the inside for toys!

I used a simple solid cotton fabric for the inside and a bold, boy themed fabric on the outside. I made mine about 45in from front to back and about 38in from side to side. I purchased a yard and a half of both fabrics, to give me the extra material for handles and window covering!

I would recommend measuring out your carseat (as each brand is slightly different) and base the amount of fabric off that. I also put a curved corner and a curved center to my cover to help leave room for grabbing the actual seat, and handles (for release). If anyone would like a tutorial please let me know and Ill be sure to get one down as soon as I can.

Hope your carseat cover is super cute,
Sarah