With our tight budget, and being on such a limited amount of spending money each month; I found I could spend almost $10 on just two cards. Seriously, when did cards turn into this extremely expensive piece of paper we give each other and then throw away? I remember buying cards that were .99 cents. I mean, where did those all go?
Well, thats when I started to think, maybe I should just MAKE the cards. That way I could personalize each card for each person. How fun would that be!? I was so excited, so I set off to do some research, check out all the unique stuff I could attempt, and began using what I had, instead of buying a bunch of cards.
I have a ton of scrapbooking product that I have slowly been using for birthday parties and small projects around the house or for family and friends. I had pretty much everything I needed in my craft room. I even had stickers for most occasions and if I didn't, I could find tons of cut outs online.
The first card I made was for my Mother, for Mother's Day (sorry Mom, I know it was horrible). The next one I made was another Mother's Day card. I had more time to make my Mother-in-laws card as I was sending her card with my Father-in laws card for Father's Day. I looked all over the internet for just anything and everything. I then tried my hand at a flower in a pot... yeah, let me just show you:
 |
| I cut out each piece and used a small gem for the center of the flower. |
 |
| I then added "Happy Mother's Day" with stickers I had on hand. |
For my Father-in-law and my husband they both got these adorable cards:
 |
| This card opens from the bottom. I used brads for the buttons on the collar. |
My husband and Father-in law both LOVED the cards, and they both said that it was pretty cool. Like father like son right? Even my oldest son was like "cool, shirt".
My Brother-in-laws birthday is the day after mine, and my sons birthday is late June. The last few posts have been about my sons birthday party and all the items I made for it. However, I didn't show off the card or show you the card I gave to my Brother-in-law for his birthday. Check the out:
 |
| This is the card I gave to my Brother-in-law. I felt it was fun, and classic for a California guy. |
 |
| The inside, I wrote "Happy Birthday", but wished I had done it with stickers. |
 |
| For my son, his party was nautical themed, so I just matched the theme. |
 |
| The inside, so cute. |
 |
| The back, with the "hand made by: Sarah Pitcher". Feels great to make a card for someone special. |
I just loved how everyone who has received their cards, has mentioned how great they are, and how personal they seem. Which is why I like making them, but hey, my wallet is liking it too. I have spent zero dollars on these cards so far. I have used stickers, paper, scissors, brads, glue and sticky tape from my scrapbooking supplies. Its just great to finally be putting it all to use.
In July my sister and my brother both have birthdays. I was so excited to do one for my family! I wanted to see what they thought of my card making skills.
My sisters card, I wanted it to be colorful, and seem fun and full of cheer for her birthday. I always hate the fact that I can't be there to celebrate with them, because were military and we rarely can be in town for those events. However, now that I can make cards more personal, I felt like maybe it will make her feel like I am giving her a hug when she opens it. Sure enough, my sister said she LOVED the card.
 |
| It says "Happy Birthday Rachel!" |
The triangles are only glued at the top, so they are loose and flip up on the end, which gives them that movement, and makes them feel more alive.
 |
| This card opened from the bottom and I added a few strips of colored paper. |
 |
| I added some stickers to add a little visual accent, and I wrote a personal message inside. |
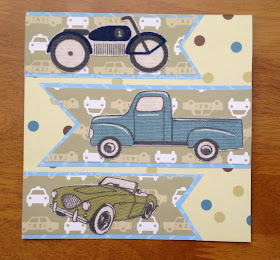
My brothers card, I again used those vintage cars, and cut each one out. I then cut out banners in two different paper colors, and glued them all together. I then alternated the directions and the card really came out masculine but super cute. I could totally change the colors to pink purple and maybe a soft yellow, and find flowers or something they like; and then it would be a perfect female card as well.
 |
| The cars are from fabric I had used for a project awhile back. |
 |
| The inside quote went well with the idea of riding in a car. |
 |
| Like all my other cards I have been adding this too the backs. |
I made two more birthday cards in August for my Mother-in-law and my Father-in-law. I am starting to get better at this card making stuff, and really wanted to do some fun bold cards. I went with a little more modern style and also went with clean lines and a simple design. I mean, how do you not like this card:
 |
| This card is a lot more pink and purple then the colors show. I believe its the lighting. |
The idea was to make a cupcake. I hope everyone can see it?
 |
| I had some birthday stickers, which I loved the cake, because it matched the colors of this card perfectly. |
 |
| The back, of course, had its touch. |
This card is a light pink with sage green diamonds. However, the colors are just not that bold in the photo... use your imagination. Bad lighting, next time Ill try to get better photos.
For my Father-in-law, I went with a fun tiered cake.
 |
| I just used different paper with different themed designs on them, and cut them into a cake. |
 |
| I then used a velum quote and added the brown frame around it. |
 |
| I cut out 3 curved pieces of paper, stacked and glued them together, added some stickers and it all came together nicely. |
 |
| Had to add the detail to the back. |
I wanted to make a few cards for the future, but only got around to one. Hey, I had some sewing projects I wanted to work on more so. Anyways, with everyone graduating this summer, I thought Ill make a graduation card.
 |
| I kept it blank on the inside for now, who knows when I will use it, but I sure do love it. |
The tassel on the hat is made from embroidery floss. I again, have tons of that on hand.
Well, thats all the cards for now. I have a few more birthdays, and of course some holiday cards to make; so keep an eye out for those too. If you want to see a TUTORIAL or a few HOW TO photos, feel free to leave a comment and I'll do my best to make a few.
Give Your Next Gift a Handmade Touch,
Sarah


Your cards show you have made them with love. I am sure your family and friends will enjoy receiving your thoughtful cards
ReplyDeleteThank you, I am enjoying working on some baby shower/welcome baby cards and also holiday cards, right now. I can't wait to show those off soon!
Delete